Rolling your own GitOps: DNS Zone files
I like to self-host my own infrastructure. You have full control. You learn a lot. It is also not hard to get started.
Managing your infrastructure though, wow, what a pain. Take DNS. To make a simple DNS record change first I have to edit the zone file, which is manual, but feels technical in a good way, like I am in control. Unfortunately the process only gets more tedious from there. First I commit the change and push it up. Then I SSH into my server and pull down the changes. Then I rebuild the Docker image. Then I kill the running container and start a new container with the new image. Then I SSH into the other server–you always need redundancy with DNS–and repeat the same steps again.
So tedious. Compare all that with a hosted DNS service, where you log into the web interface, tweak the record, and… that’s it.
Maybe there is a way we can have the best of both worlds. GitOps would be a good fit here. Like what if all you had to do was edit the zone file and commit the change, then let every step after that be handled automatically. You know, it probably wouldn’t be that hard…
Steps
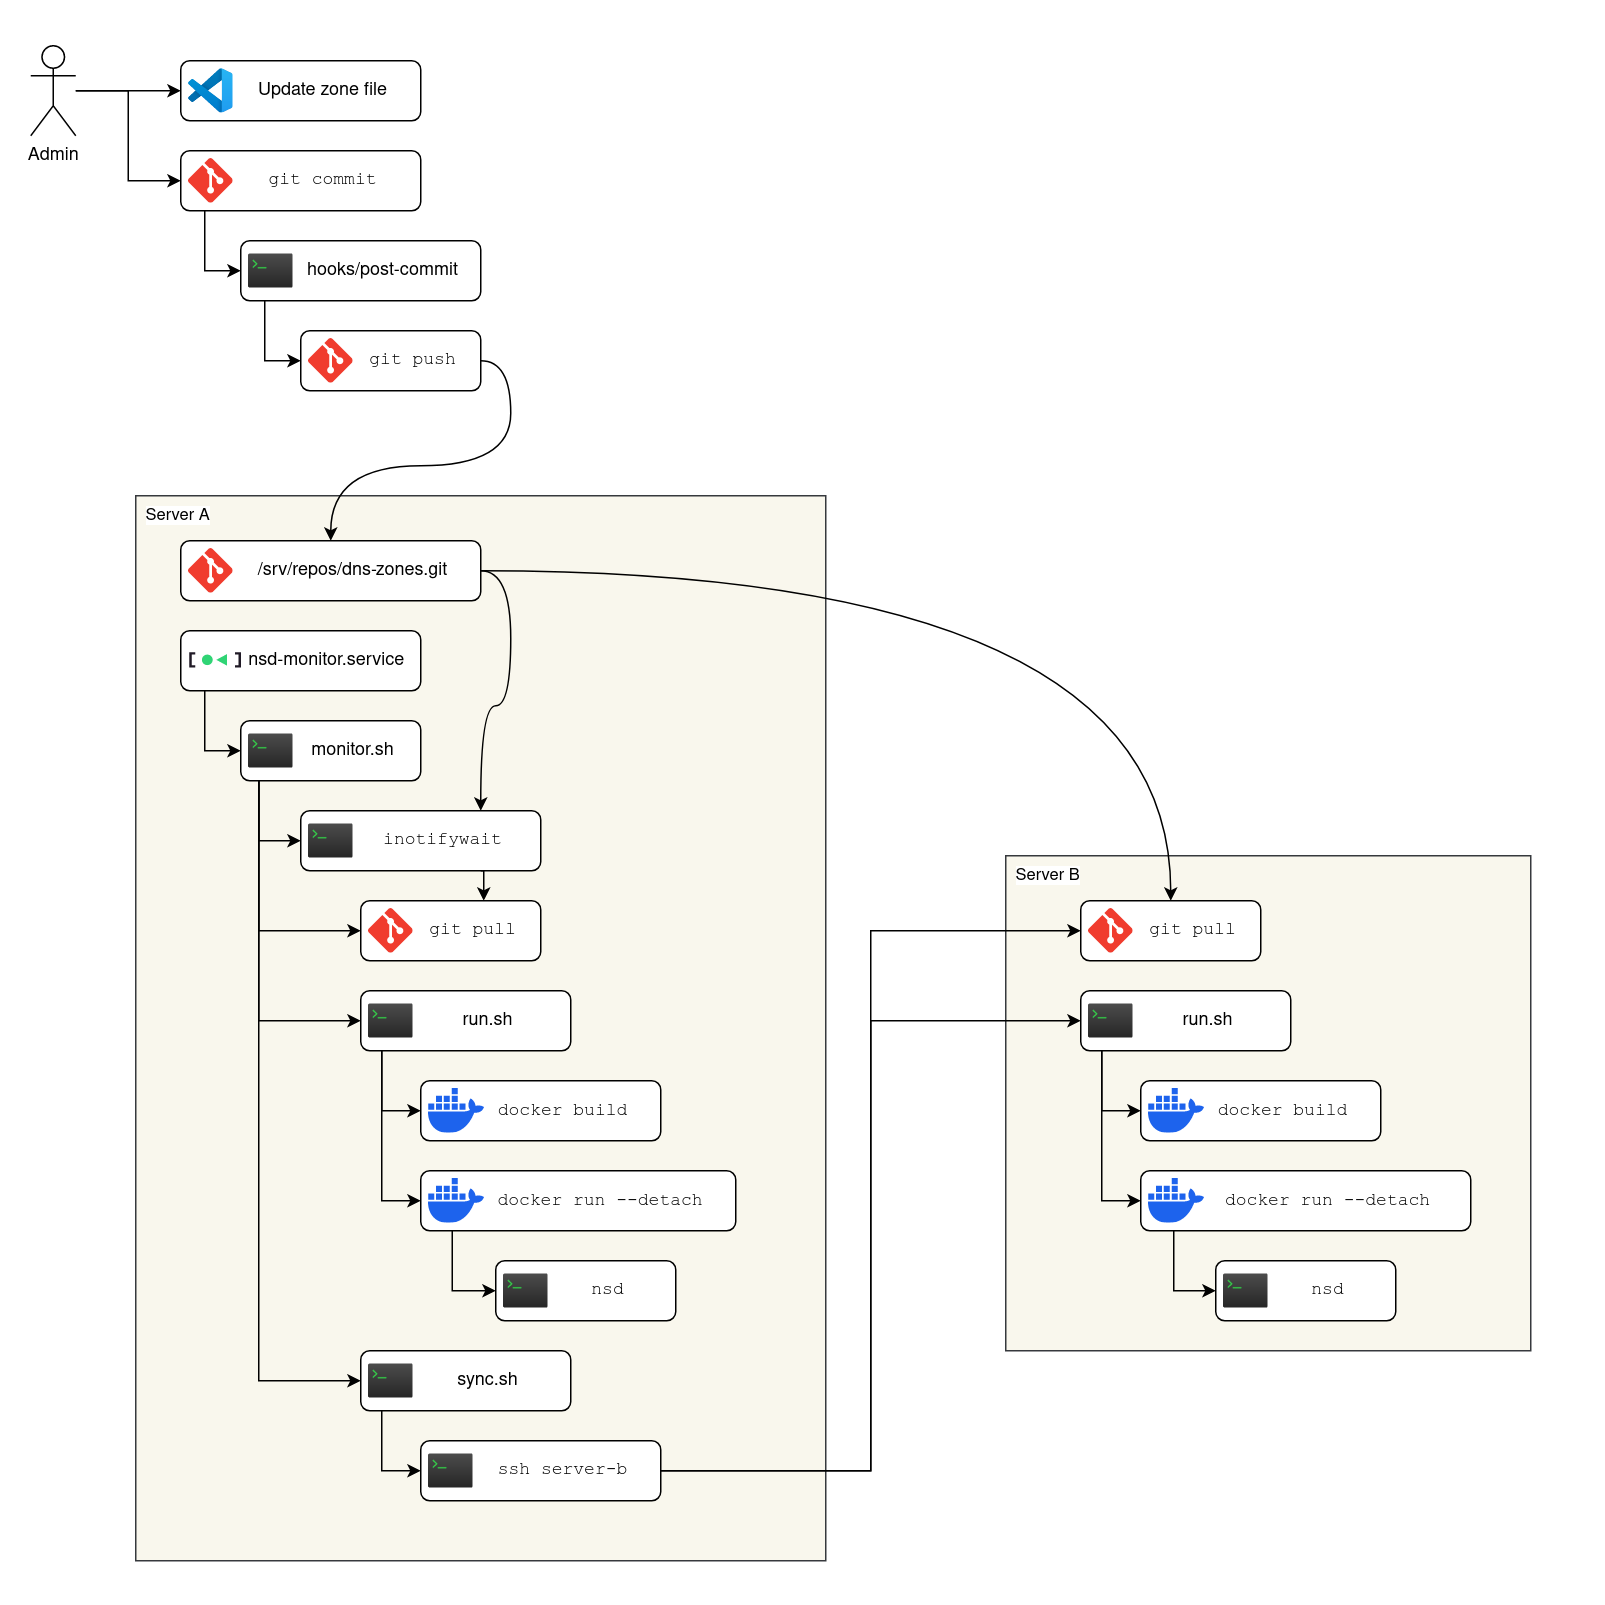
The rest of this post is a walkthrough for implementing the above system diagram. The number of moving parts looks intimidating, but actually each part is so simple that you’re more likely to be bored1 reading the code than feeling in-over-your-head.
To make the steps easier to follow, let’s follow the diagram working from outside in:
0. git init
This guide assumes that you already have one or more zone files defined. I won’t be covering how to configure DNS from scratch, just how to implement GitOps assuming you already have some type of basic DNS set up.
Initialize (git init) your local directory if you haven’t already and commit the zone files.
1. Set up a post-commit hook (Optional)
Why manually run two commands (git commit, git push) when one will suffice? From your local git directory create a .git/hooks/post-commit file containing:
#!/bin/sh

if [ -d ".git/rebase-merge" ] || [ -d ".git/rebase-apply" ] || [ -f ".git/MERGE_HEAD" ] || [ -f ".git/CHERRY_PICK_HEAD" ] || [ -f ".git/BISECT_LOG" ]; then
  exit 0
fi

git push
(For this and all later shell scripts in this post don’t forget to chmod +x the file to mark it as executable.)
Now you only need to commit your desired changes, the push will happen automatically.
2. Create the remote git repository
The GitHub hegemony has become so ingrained that it has probably never even occurred to most git users that you can host your own remote repository.2
- Open an SSH session to Server A
-
Set up the
/srv/reposdir:sudo mkdir -p /srv/repos sudo groupdd git sudo setfacl --modify default:group:git:rwX /srv/repos -
Then create the repo:
sudo git init --bare --shared /srv/repos/dns-zones.git
The ACL set up is possibly overkill for the simple needs of this one project, but I include it to show how easy and powerful it is to manage arbitrarily complex permissions on as many self-hosted git repositories as you want to create.
Back in your local git directory, set up the remote:
git remote add origin server-a:/srv/repos/dns-zones.git
git push
(Replace server-a with the actual hostname of the server.)
The push may fail if your SSH user doesn’t have write access to /srv/repos. Simply add your user account on Server A to the git group we previously set up, then try the push again.
3. Create service users
We will be running NSD for the DNS server software.
On both Server A and Server B create a system user:
sudo useradd --create-home --groups docker,git --system nsd
While we are on Server A and Server B we will also set up mutual authentication:
sudo -u nsd ssh-keygen -f ~nsd/.ssh/id_ed25519 -N '' -t ed25519
cat ~nsd/.ssh/id_ed25519.pub
Take the public key output from Server A then add it to the authorized keys on Server B:
sudo -u nsd sh -c 'umask 077; cat >> ~/.ssh/authorized_keys'
# Paste in the key from the other server, then press Ctrl-D
Repeat with the key from Server B on Server A.
4. Clone the repo everywhere
We already have a clone of the repo locally. We also have a remote bare repository on Server A.
We still need a clone on Server A for the nsd user:
sudo -i -u nsd git clone /srv/repos/dns-zones.git
We also need a clone on Server B:
sudo -i -u nsd git clone server-a:/srv/repos/dns-zones.git
5. Define the monitor service
For simplicity, I recommend defining all the scripts in the same dns-zones.git repository as the zone files live in. That way we can get the scripts everywhere without setting up even more stuff. So you can edit the scripts locally or on Server A or anywhere really, so long as you commit and push the changes, then git pull them for where they are going to be used.
Create a nsd-monitor.service file:
[Unit]
Description=NSD Monitoring Service
After=network.target

[Service]
Type=simple
User=nsd
ExecStart=/home/nsd/dns-zones/monitor.sh
WorkingDirectory=/home/nsd/dns-zones
Restart=always
RestartSec=3

[Install]
WantedBy=multi-user.target
Install the service on Server A by running:
sudo cp nsd-monitor.service /etc/systemd/system/
sudo systemctl daemon-reload
Don’t start the service yet, since we still need to set up the rest of the files.
Now create a monitor.sh file:
#!/usr/bin/env bash

set -euo pipefail

repo=$(git remote get-url origin)

inotifywait -m -e create,delete,modify --format '%w%f' "$repo" | while read -r file; do
  echo "$file changed. Updating..."
  sleep 1 # Wait for local push to complete
  git pull
  ./run.sh
  ./sync.sh
done
6. Configure NSD
Create a Dockerfile file:
FROM alpine

RUN apk update && apk add nsd
RUN mkdir -p /run/nsd

COPY nsd.conf *.zone /etc/nsd/

CMD ["/usr/sbin/nsd", "-d", "-c", "/etc/nsd/nsd.conf"]
Create an nsd.conf file:
server:
  hide-identity: yes
  hide-version: yes

zone:
  name: yourdomain.example
  zonefile: yourdomain.example.zone
Replace the zone: entries with your actual domain(s) and zone file(s).
7. Define the run script
Create a run.sh file:
#!/bin/sh

set -e

docker build --tag nsd .

# Sometimes there is a resolver listening on 127.0.0.1:53
# Bind to the public IP explicitly to avoid conflicts
publicip="$(ip route get 8.8.8.8 | sed -nE 's/.*src (\S+).*/\1/p')"

docker rm --force nsd
docker run \
  --detach \
  --name nsd \
  --publish "${publicip}:53:53" \
  --publish "${publicip}:53:53/udp" \
  --restart=always \
  nsd
Now is a good time to try running (./run.sh) the script to make sure it works. The best test is to run a query from an entirely different computer:
dig some.record.yourdomain.example @server-a
8. Define the sync script
Create a sync.sh file:
#!/bin/sh

ssh nsd@server-b 'cd dns-zones && git pull && ./run.sh'
9. Start it up
If you haven’t already, commit all the above scripts, push them up, then run git pull on Server A.
Enable nsd-monitor.service on Server A:
sudo systemctl enable nsd-monitor.service
sudo systemctl start nsd-monitor.service
Check the logs to make sure there are no errors:
sudo journalctl -f -u nsd-monitor.service
Try making a change locally to the zone file (if nothing else, bump the serial number) and commit the change. In the service output you should see the Docker image being re-built and the container re-run without error.
Summary
When you commit a zone file change, it automatically gets pushed up to the git repository that lives on Server A. There is a filesystem watcher running that automatically updates everything with the latest changes when any git changes are pushed up. First it re-builds and re-runs the NSD Docker container on Server A, then it opens an SSH connection to Server B and runs the same commands there.
Limitations
The big red flag with this set up is that there are no safe-guards in place if you make a bad change to any of the files. Once you commit the bad change it will be pushed out to both servers, possibly bringing down both your DNS servers simultaneously. A safer pattern would be to roll out the change to Server A, then have Server B try to query A over DNS, perhaps checking a “health” record, then only after that succeeds does the update on Server B proceed. Personally I have other backup plans in place in case I mess up DNS, so I haven’t been motivated to implement such an automated safe-guard yet. I leave it as an exercise to the reader.
Takeaways
Instead of a how-to post, it wouldn’t have been that much extra work to build this as a re-usable project. The thing about re-usable projects though, is that there is a temptation to build them the “proper” way since other people will be adopting them. Based on the fashion of the current day, the proper way would look something like: a GitHub repo with a GitHub action that builds the Docker container and pushes it to a Docker repository, followed by triggering a Kubernetes deployment to a cluster you host. It is not that that would be a bad way to do it. However, it would be different. It would be less self-hosted for one. I think a more interesting difference is how the glue is implemented: the modern way is configuration driven; the Unix way is imperative scripts you write yourself. Once again, it is not that one is strictly better than the other. Still, I find there is a level of understanding and control that comes with the glue script model that is ultimately more satisfying.
Even in 2024, I am impressed how easy it is to roll your own solution to the problem using simple Unix tools, compared to, say, more recent advancements that you would expect to have made simple problems easier. There are good reasons people have moved away from the traditional Unix model at large companies. For personal stuff though–and even small scale professional projects–rolling your own solution by composing building blocks with glue scripts remains a viable approach.
Notes
- I usually try to avoid boring posts, but I make an exception when it comes to showing how to use boring technology. Boring technology is good, actually.
- Hosting your own git remote is crazy easy, but you may prefer to host the repository in a centralized service to keep all your repositories in one place. If you do that though, you won’t be able to use the
inotifywaitwatcher pattern described in this post. Making all this work with GitHub webhooks is left as an exercise to the reader.