Install LineageOS On OnePlus 6
This guide will walk you through installing LineageOS 16 on the OnePlus 6 phone. There are official installation instructions, but they don’t explain the nuances of working with an A/B phone like ours. Let me help you avoid hard bricking your phone like I did. And if it happens anyway, don’t worry—I can show you how to fix that too.
No previous Android experience is necessary. Everything you need to know will be explained here, or covered by a link to the relevant page elsewhere. Having command line experience will be helpful. However, if you don’t know it, you can probably figure it out.
You will need a computer to be able to complete all the steps. With one exception, everything in this guide should work regardless of whether you are on Linux, OS X, or Windows.
Update 2019/11/5: it has come to my attention that there is an issue with this guide. It works great for installing LineageOS on your phone. However, if you follow the exact steps outlined here you may run into issues when updating LineageOS to a newer version. I believe the issue occurs if you don’t have the latest stock ROM flashed to both slots. When I have more time I would like to update the steps in this guide to ensure that updates will work. In the meanwhile, you have been warned.
tl;dr
- Update Your Phone To The Latest Version (Optional)
- Unlock the bootloader
- Transfer ROM files to the phone
- Boot TWRP with FastBoot
- Flash the latest, stock OxygenOS ROM
- Swap slots
- Wipe the system partition
- Perform a factory reset
- Swap slots
- Flash the LineageOS zip file
- Flash TWRP
- Reboot into Recovery
- Install GApps (Optional)
- Install Root (Optional)
- Reboot into the system
Yes, that is an intimidating list. But the list is actually complete. And many of the steps are repeats, so once you get the hang of it the process will go quickly.
Why LineageOS?
LineageOS is an community maintained Android OS, derived from the Android Open Source Project (AOSP). It supports pretty much everything a stock phone can do, but it comes with none of the bloat and spyware (like the Facebook app) bundled on most phones.1 It is also common for new versions of LineageOS to be released for a phone long after the manufacturer stopped supporting it.
For me, the biggest advantage is knowing that I could have near-complete2 control over the device if I really wanted to change something. In practice, I like the privacy3 features built into the phone, and the ability to stop all Google spying by not putting Google services on the phone in the first place.
Why the OnePlus 6?
The OnePlus 6 is a relatively modern phone, with nice features such as a modern camera. Also, it is easy to buy one currently. But most importantly, it has an unlockable bootloader, meaning it is easy to develop custom ROMS for it, hence the official LineageOS support for the device.
Important: the OnePlus 6 is not the same as the OnePlus 6T. When I was shopping for a phone, only the 6 had official LineageOS support. As of last week the 6T and 7 now have official LineageOS support.
Disclaimer: You Could Screw Up Your Phone
The actions described in this post have the potential to mess up your phone and/or computer. I will do my best to steer you away from common pitfalls, but I can’t foresee every failure mode. You take sole responsibility for your actions.
If you think you have messed up your phone, see: recovering a bricked phone.
Pre-requisite: Back Up Your Phone Data
Nothing will be left on your phone if you complete all the steps in this guide. Any files on the phone, apps, message history, settings—they will all be gone.
I am not going to tell you what to do here, because there are thousands of ways to back up your phone. Personally, I export all my data to files, then use Syncthing to send the files to other devices. But you do whatever you are comfortable with.
Pre-requisite: Android Platform Tools
We are going to need the fastboot tool, so let’s install it now:
- Download the SDK Platform Tools on to your computer
- Unzip the tools to any directory where you can find them
- Add that directory to your PATH (Linux/Mac, Windows)
To confirm that the tools are installed correctly, try running: fastboot --version
You should see a line like this:
fastboot version 29.0.2-5738569
I recommend running version 29 or newer. Anything older and you are inviting problems to occur. If you downloaded the latest version, but still see an older version number when you run fastboot, try adding the tools directory to the beginning of your PATH.
If for some reason the Platform Tools zip does not work, you can try installing the full Android Studio, which both includes the Platform Tools and comes with a GUI that makes setting things up a little easier.
1. Update Your Phone To The Latest Version
If you are running the stock ROM on your phone, I recommend letting OxygenOS update itself to the latest version (Settings → System → System updates). This will hopefully avoid any issues trying to boot the latest version of TWRP.
If for some reason your phone can’t update to the latest version, or you are running a different custom ROM, you should still be able to follow the rest of the steps. However, you may need to tweak some of the instructions. If you run into issues booting TWRP in step 4, you may need to try a prior version of TWRP instead of the latest version.
2. Unlock the Bootloader
To be able to do anything on the phone, we first need to unlock the boot loader. (What is bootloader unlocking?)
If for some reason your bootloader is already unlocked (you’ll know because your phone shows an unlocked bootloader warning when it starts up), you can skip this step. However, before proceeding to step 3 you should first format your data partition.
Enable Bootloader Unlocking
The first step is to disable the security lock that prevents unlocking:
- Start your phone normally
- Enable developer options (if you haven’t already)
- Navigate to Settings → System → Developer Options
- Enable the OEM unlocking toggle
- Enter your password (if prompted)
- Click Enable on the confirmation prompt
Run Fastboot Unlock
The next step is to put the phone in bootloader (“fastboot”) mode. (What is fastboot?)
- Disconnect the USB cable from your phone (if plugged in)
- Turn off your phone
- Hold down Volume Up+Power to turn on your phone
- Connect your phone to the computer with a USB cable
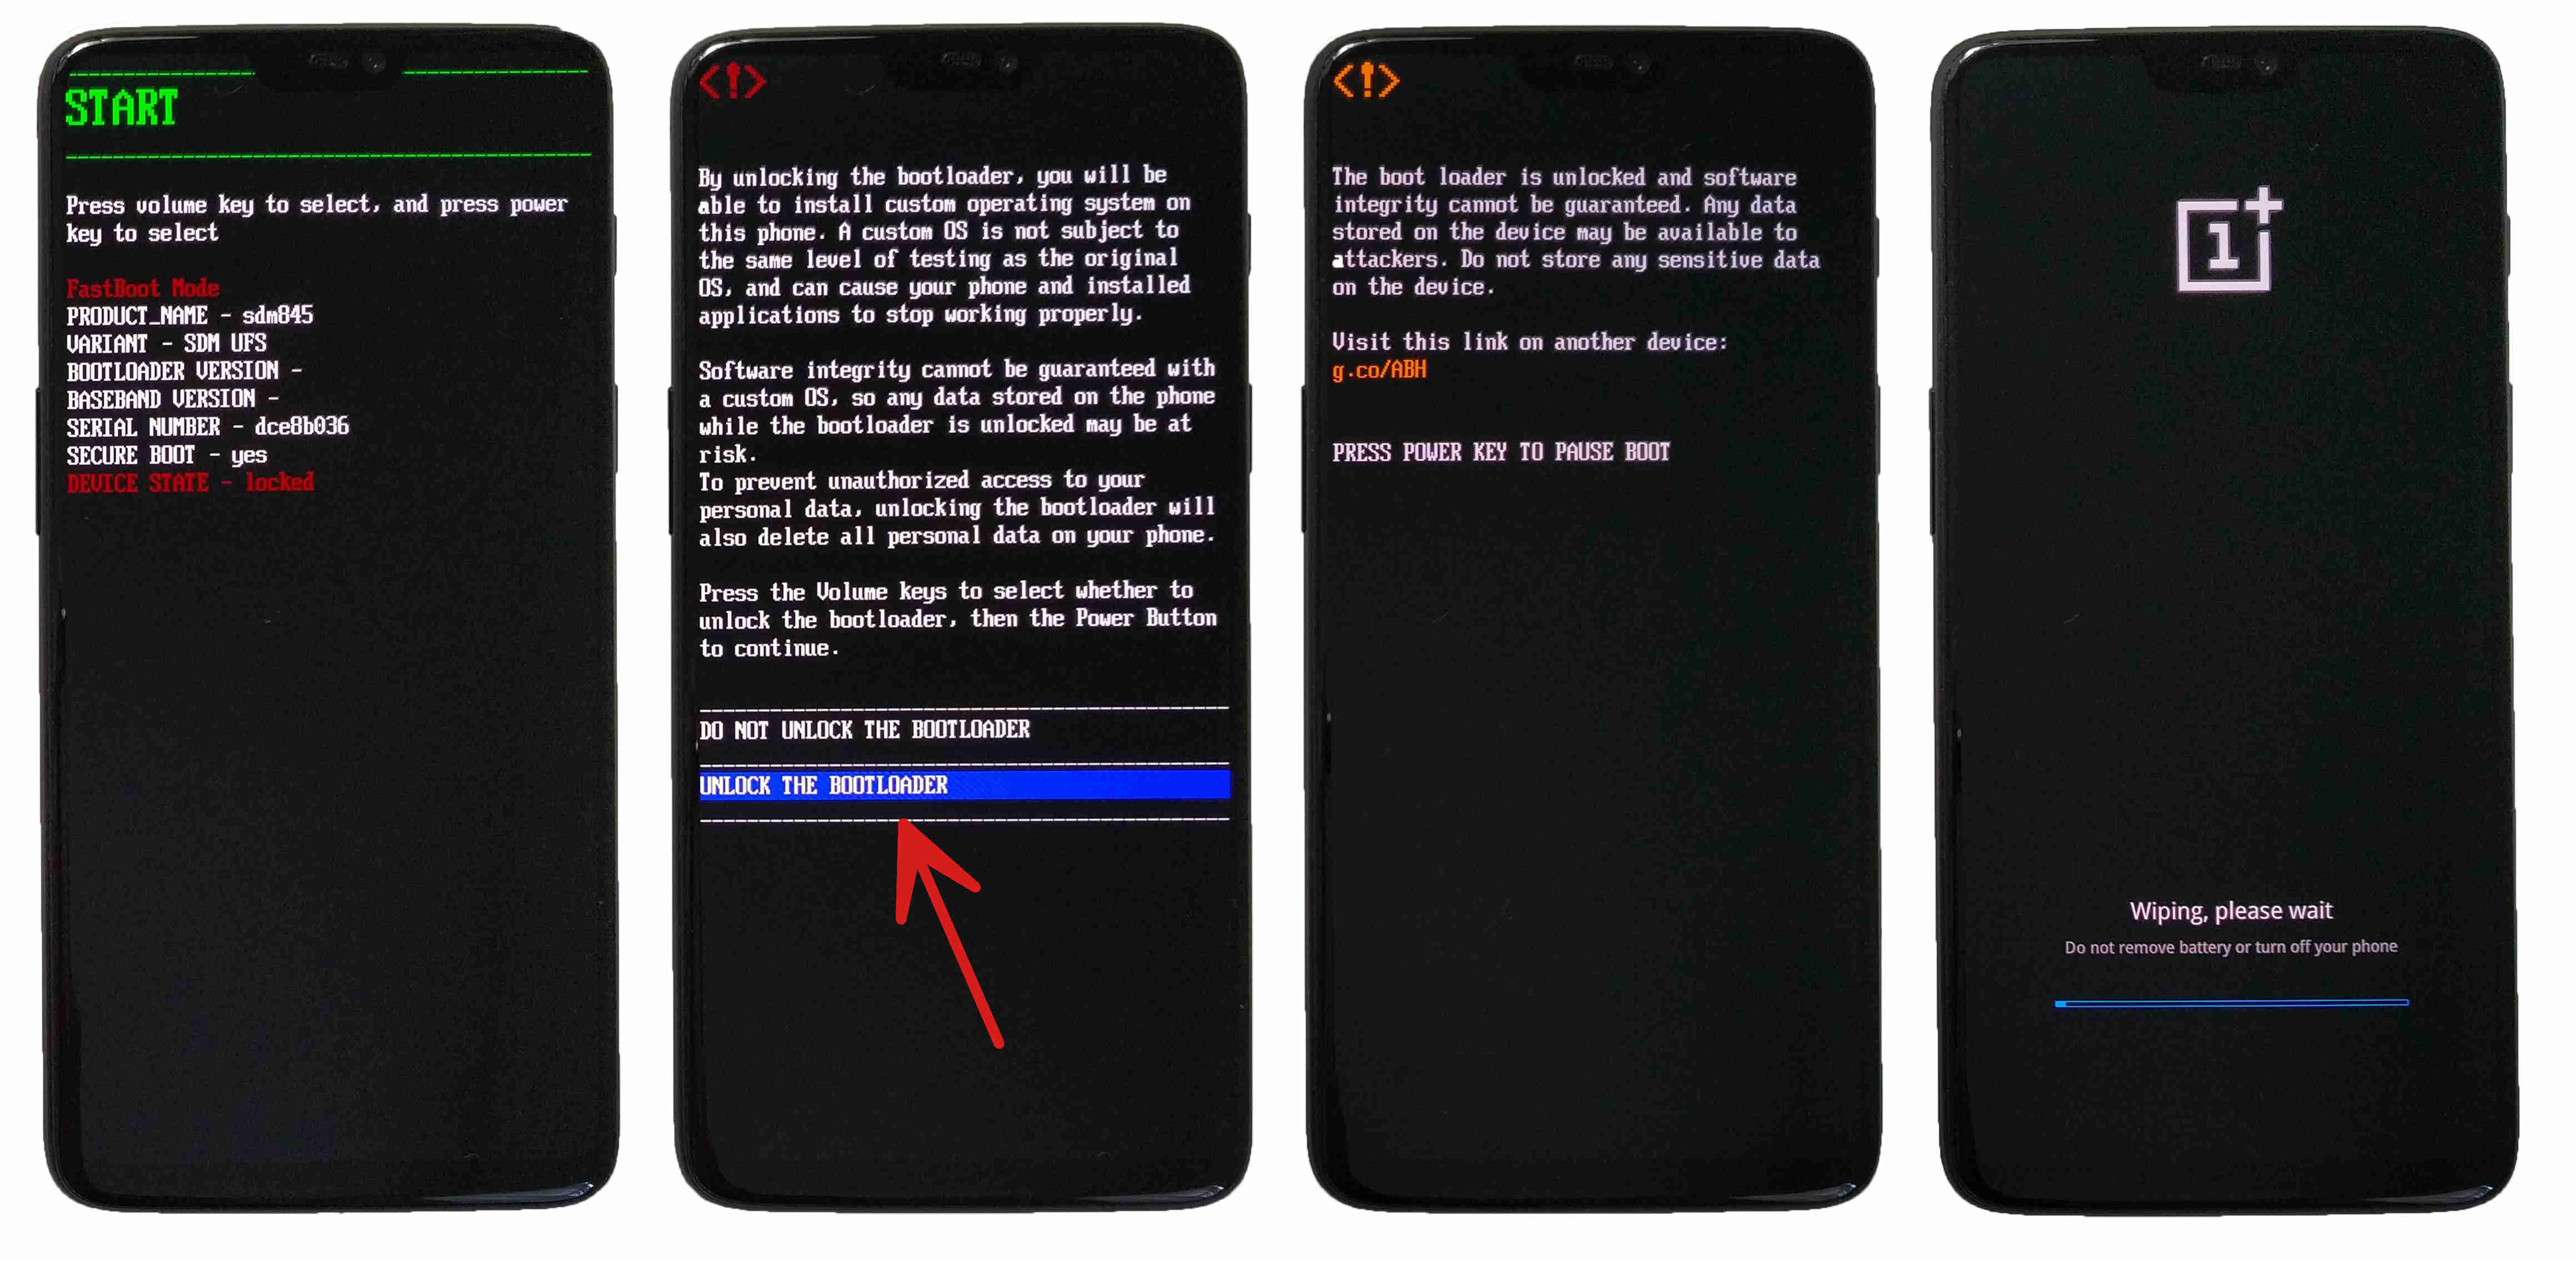
If you did it correctly you should see “FastBoot Mode” on the phone. If it doesn’t show up, keep re-trying the steps until it works.
From your computer, you should now be able to run fastboot devices and see your phone listed. If you get a permissions error, you may have to run the command with elevated privileges (Linux/Mac, Windows). If it still doesn’t work, try a different USB port (or another computer).
Warning: this is the first point of no return. When you unlock the bootloader, any and all data you put on the phone will be erased.
Run the following command to unlock the bootloader:
fastboot oem unlock
From the phone, use the volume buttons to select UNLOCK THE BOOTLOADER and press Power.
This will wipe the phone and automatically reboot it.
Note: from now on when your phone starts up it will display a warning about the bootloader being unlocked. You can safely ignore this warning.
3. Transfer ROM files to the phone
To avoid any complications later, I recommend transferring all the files we are going to need on to the phone at this time.
One option to transfer the files is to boot the phone into TWRP recovery (which is explained in the next step) and rely on its MTP support to transfer the files from your computer. Feel free to do that if that is what you are most comfortable with.
The other option is to use the stock ROM to transfer the files. Since your phone probably just booted into the stock ROM (after unlocking it), this option might be the easiest. It is also a little more foolproof (since TWRP MTP support can be hit and miss). Keep in mind you will have to complete the first-time setup before the stock ROM will let you transfer files. When you are prompted, do not enable any sort of screen lock / PIN / password. Doing so would enable encryption on the data partition, which will mess up subsequent steps (see Formatting the Data Partition for a fix).
You can download all the files to your phone directly from the internet, or you can download the files to your computer and transfer them over to your phone. It is up to you.4
- Download the latest stock ROM
- Verify the MD5 checksum (Optional)
- Download the latest LineageOS nightly
- Verify the SHA-256 checksum (Optional)
- Download the latest TWRP installer .zip
- Download and verify the GPG signature (Optional)
- Download Google Apps for Android 9.0/ARM64 (Optional)
- Verify the MD5 checksum (Optional)
- Download some sort of su addon, if you want root (Optional)
The rest of the instructions will assume that you put all the files in the root of the Internal Storage drive (/sdcard) on the phone. If you put the files somewhere else, adjust the instructions accordingly.
Once all the files are on the phone, you are ready for the next step.
4. Boot TWRP with FastBoot
For the remaining steps, we need to put the phone in recovery mode. (What is recovery?)
The stock recovery is not powerful enough to do what we want, so we will download TWRP to use as our recovery software:
- Go to the TWRP page for our phone again (from your computer)
- Click on the link to the downloads page
- Download the latest
.imgfile
We now need to put the phone in bootloader mode again:
- Disconnect the USB cable from your phone (if plugged in)
- Turn off your phone
- Hold down Volume Up+Power to turn on your phone
- Wait for the “FastBoot” bootloader menu to show up (same as before)
- Connect your phone to the computer with a USB cable
You should now be able to run the following command from your computer:
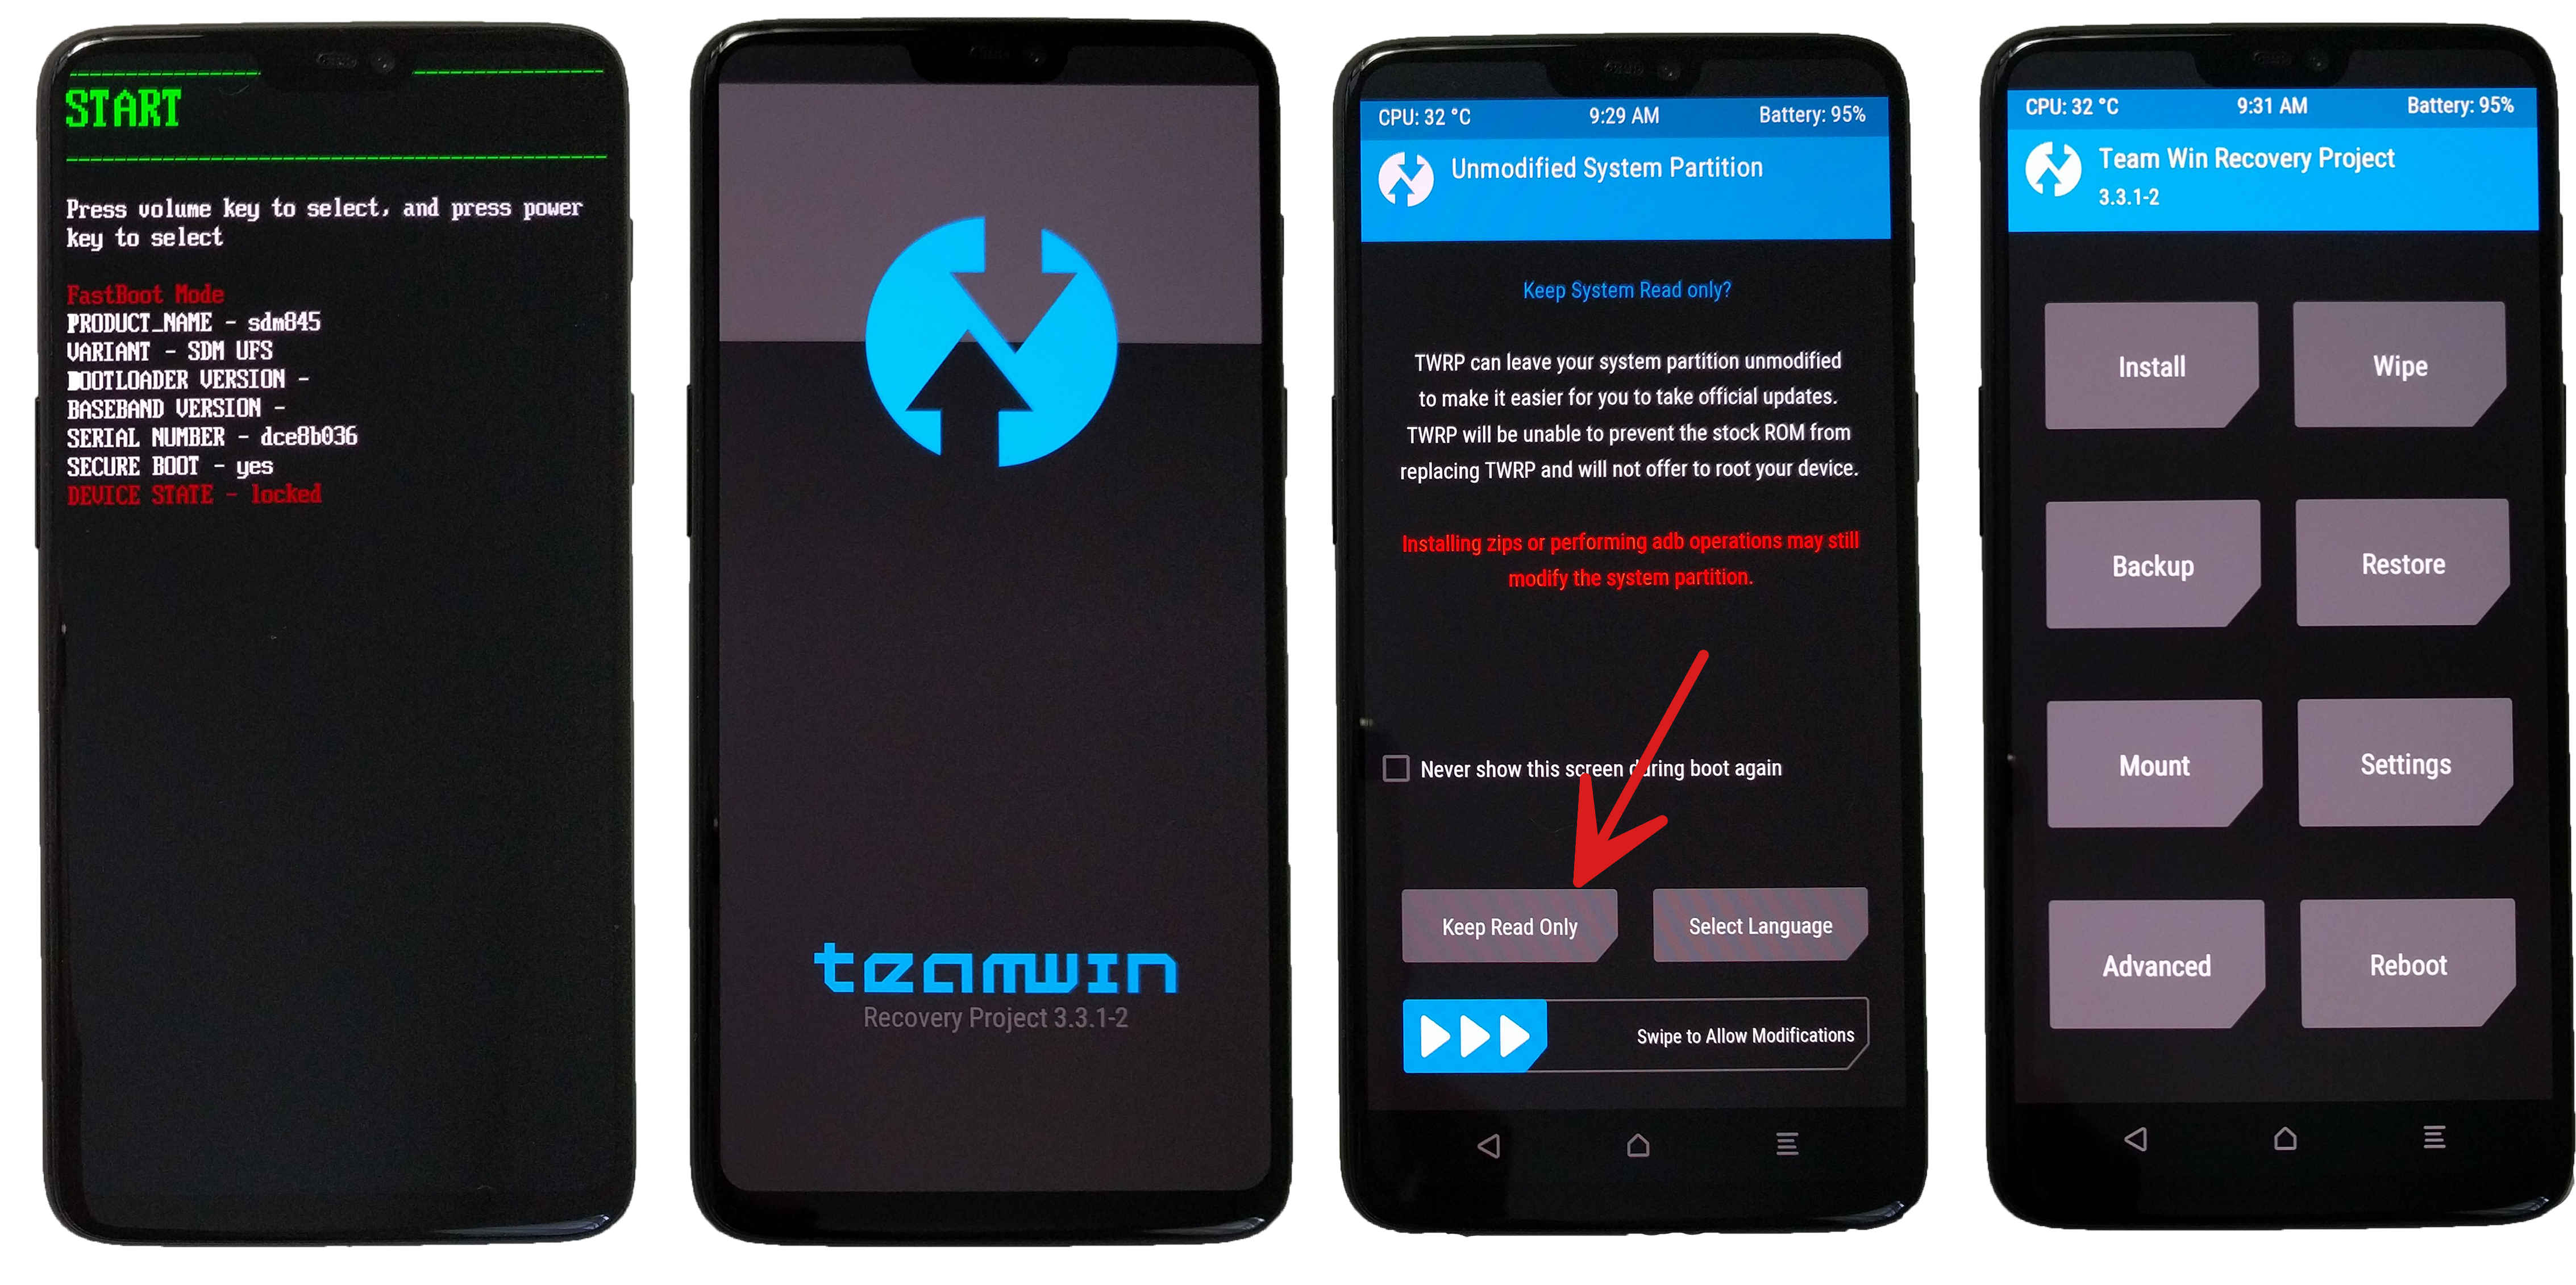
fastboot boot twrp-3.3.1-2-enchilada.img
(Replace 3.3.1-2 with the actual version you are using.)
If all goes well, you should see a TWRP splash screen. You may be prompted by TWRP to “Keep System Read only?”. You can press Keep Read Only, since we don’t need to worry about that yet. Once you get to the TWRP menu, you are ready for the next step.
Note: TWRP is not installed at this point. But that’s OK, because we don’t need it to be in order to wipe everything.
If for some reason TWRP does not boot correctly, try all the steps again to make sure you didn’t miss anything. If it still doesn’t work, try using different versions of TWRP, since different stock firmware versions require different versions of TWRP. At the time of writing, you can download a newer, unofficial version (3.3.1-3) from the XDA support thread.
5. Flash the latest, stock OxygenOS ROM
Warning: this is the last point of no return. Whenever you flash to (or wipe) the system partition, you have the potential to make the phone un-usable.
Even though LineageOS bills itself as an operating system (OS), it is not quite a complete phone OS on its own. We need the right version of the proprietary bits that come with the stock ROM firmware. (Why does LineageOS need a specific stock ROM version?)
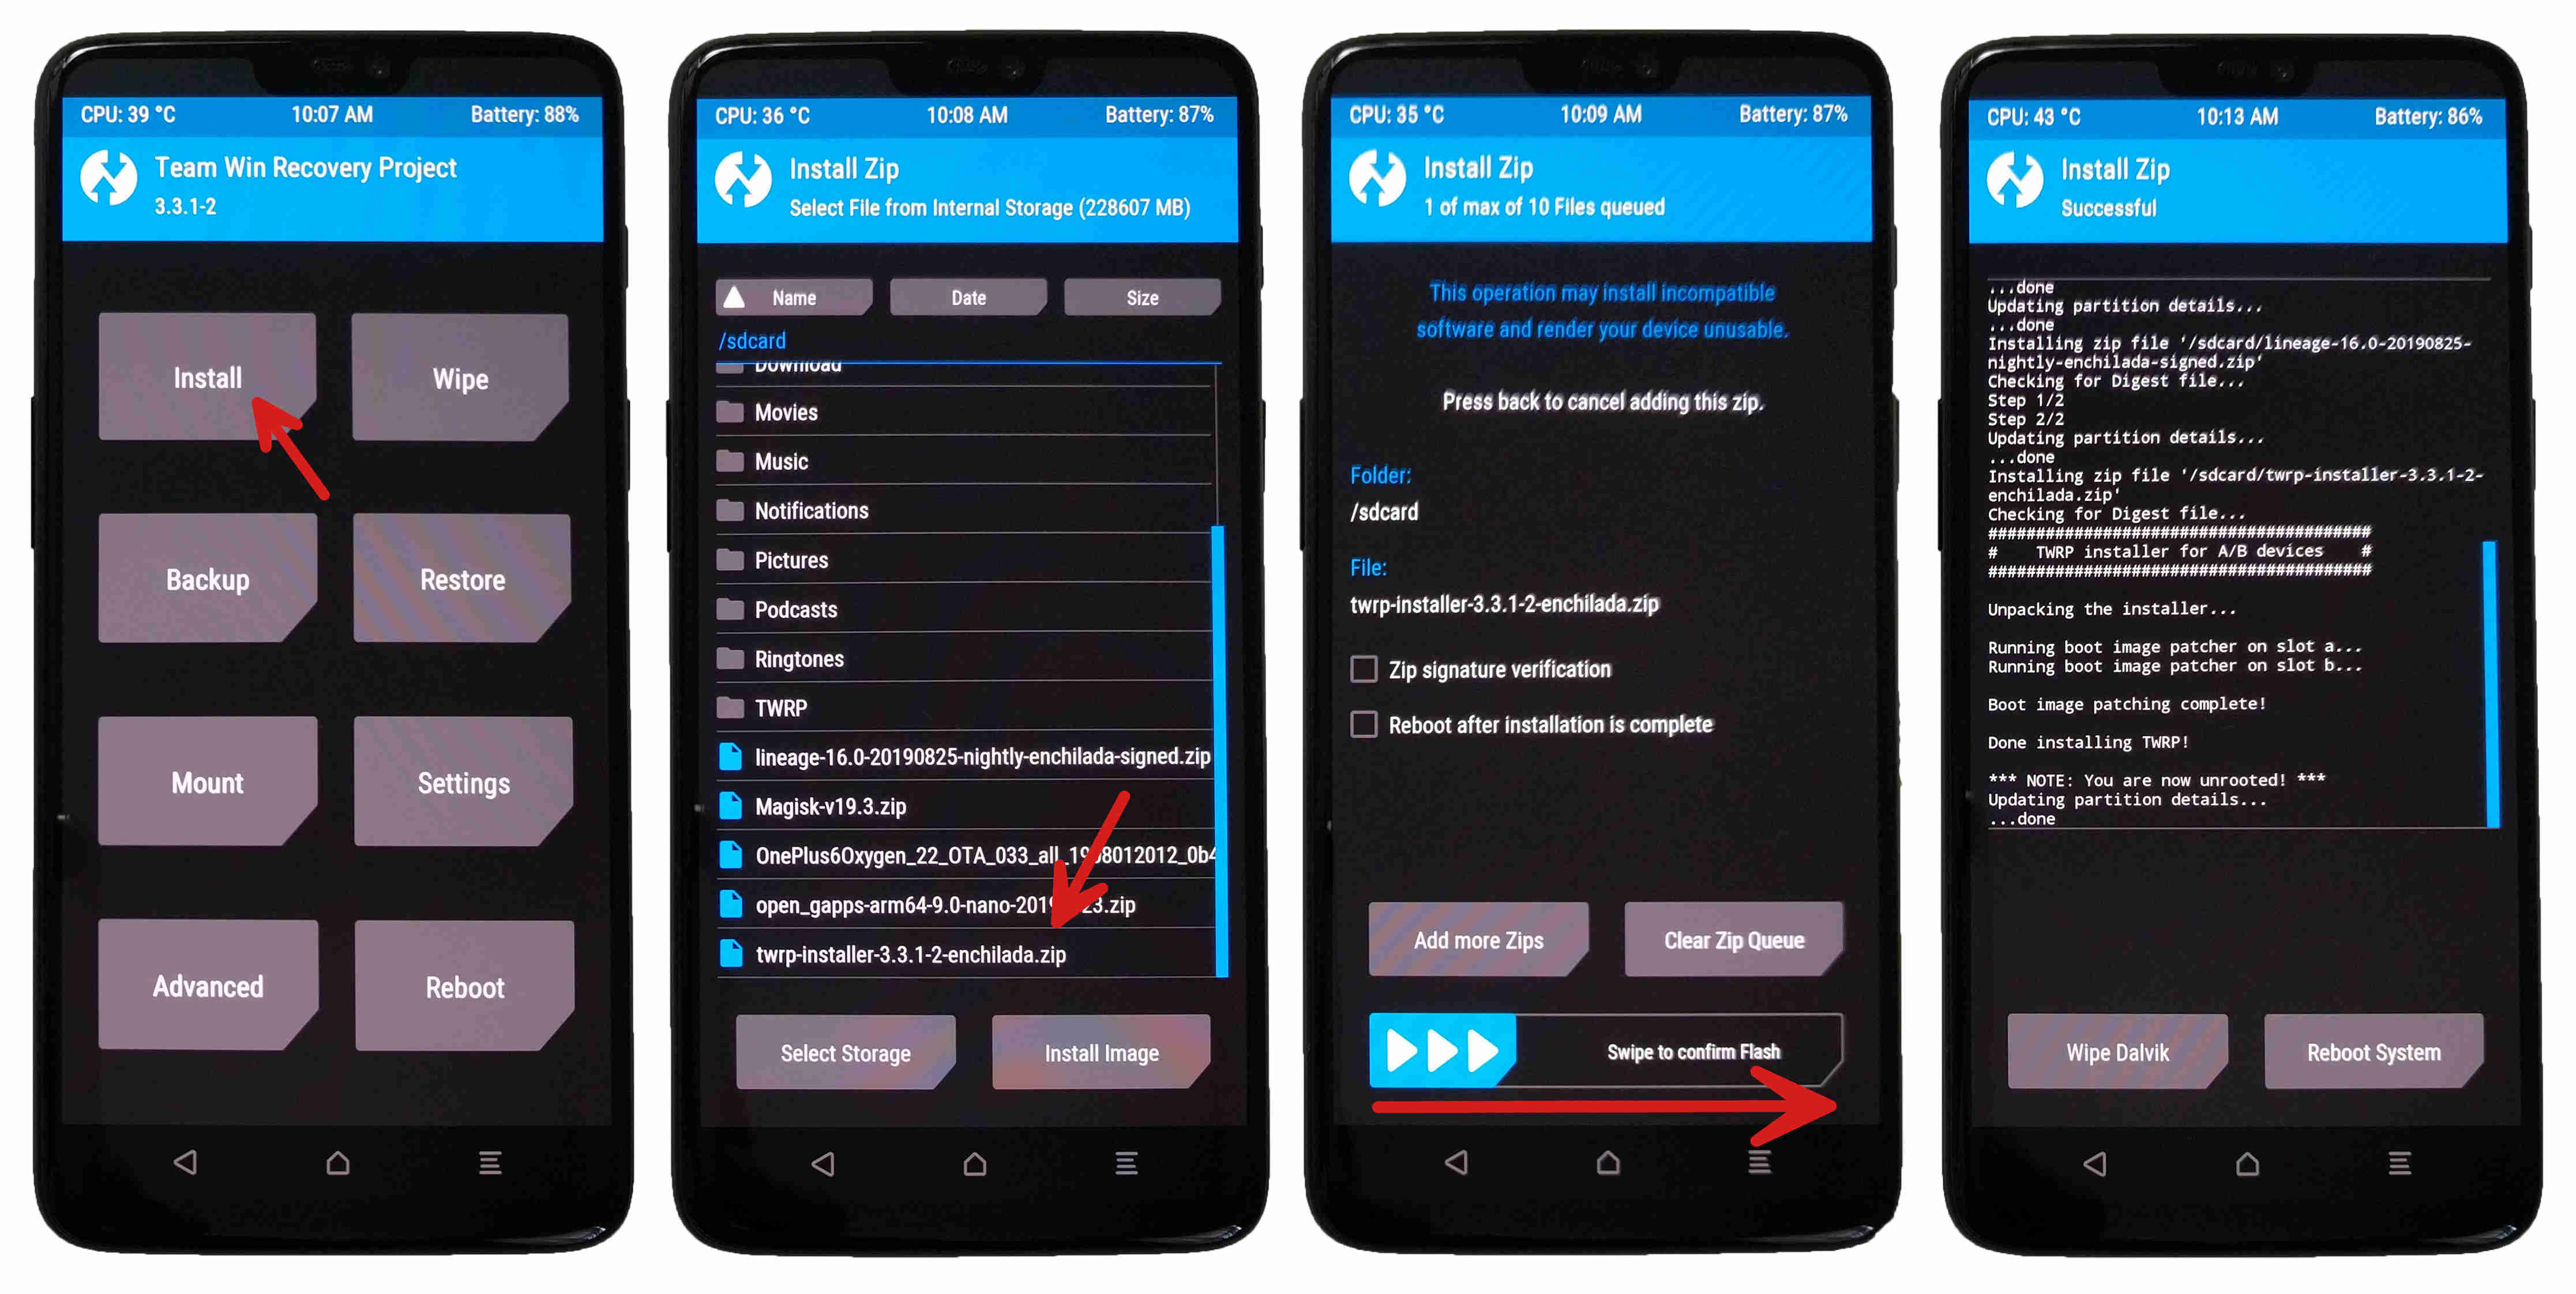
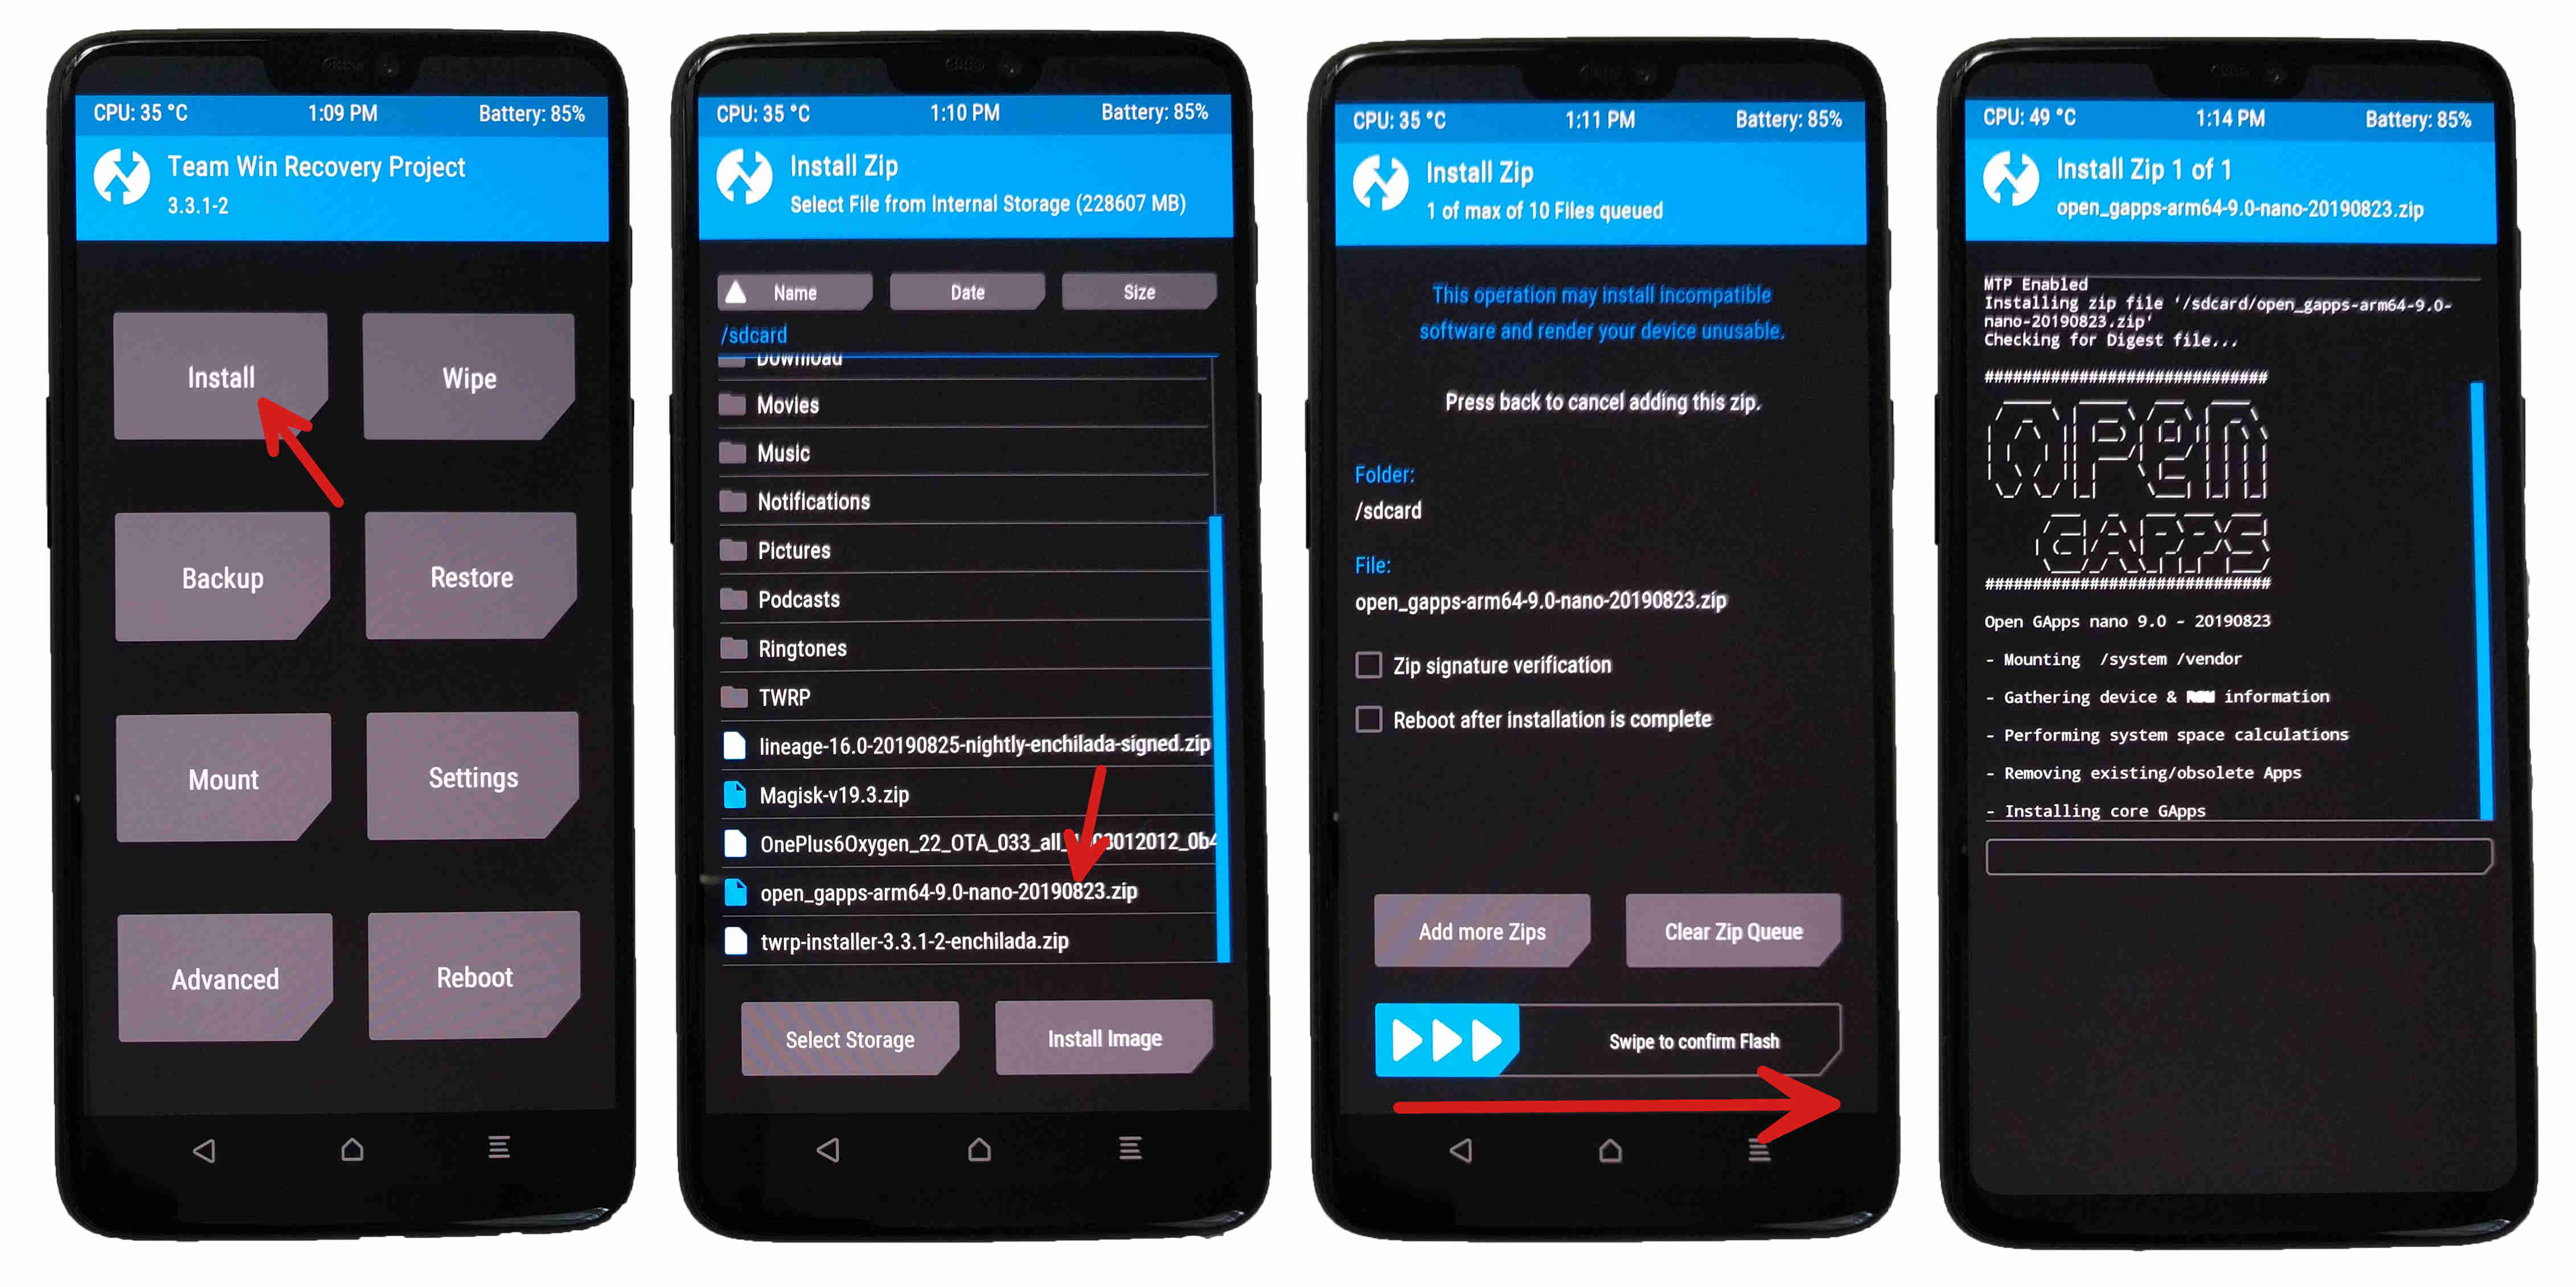
From TWRP on your phone:
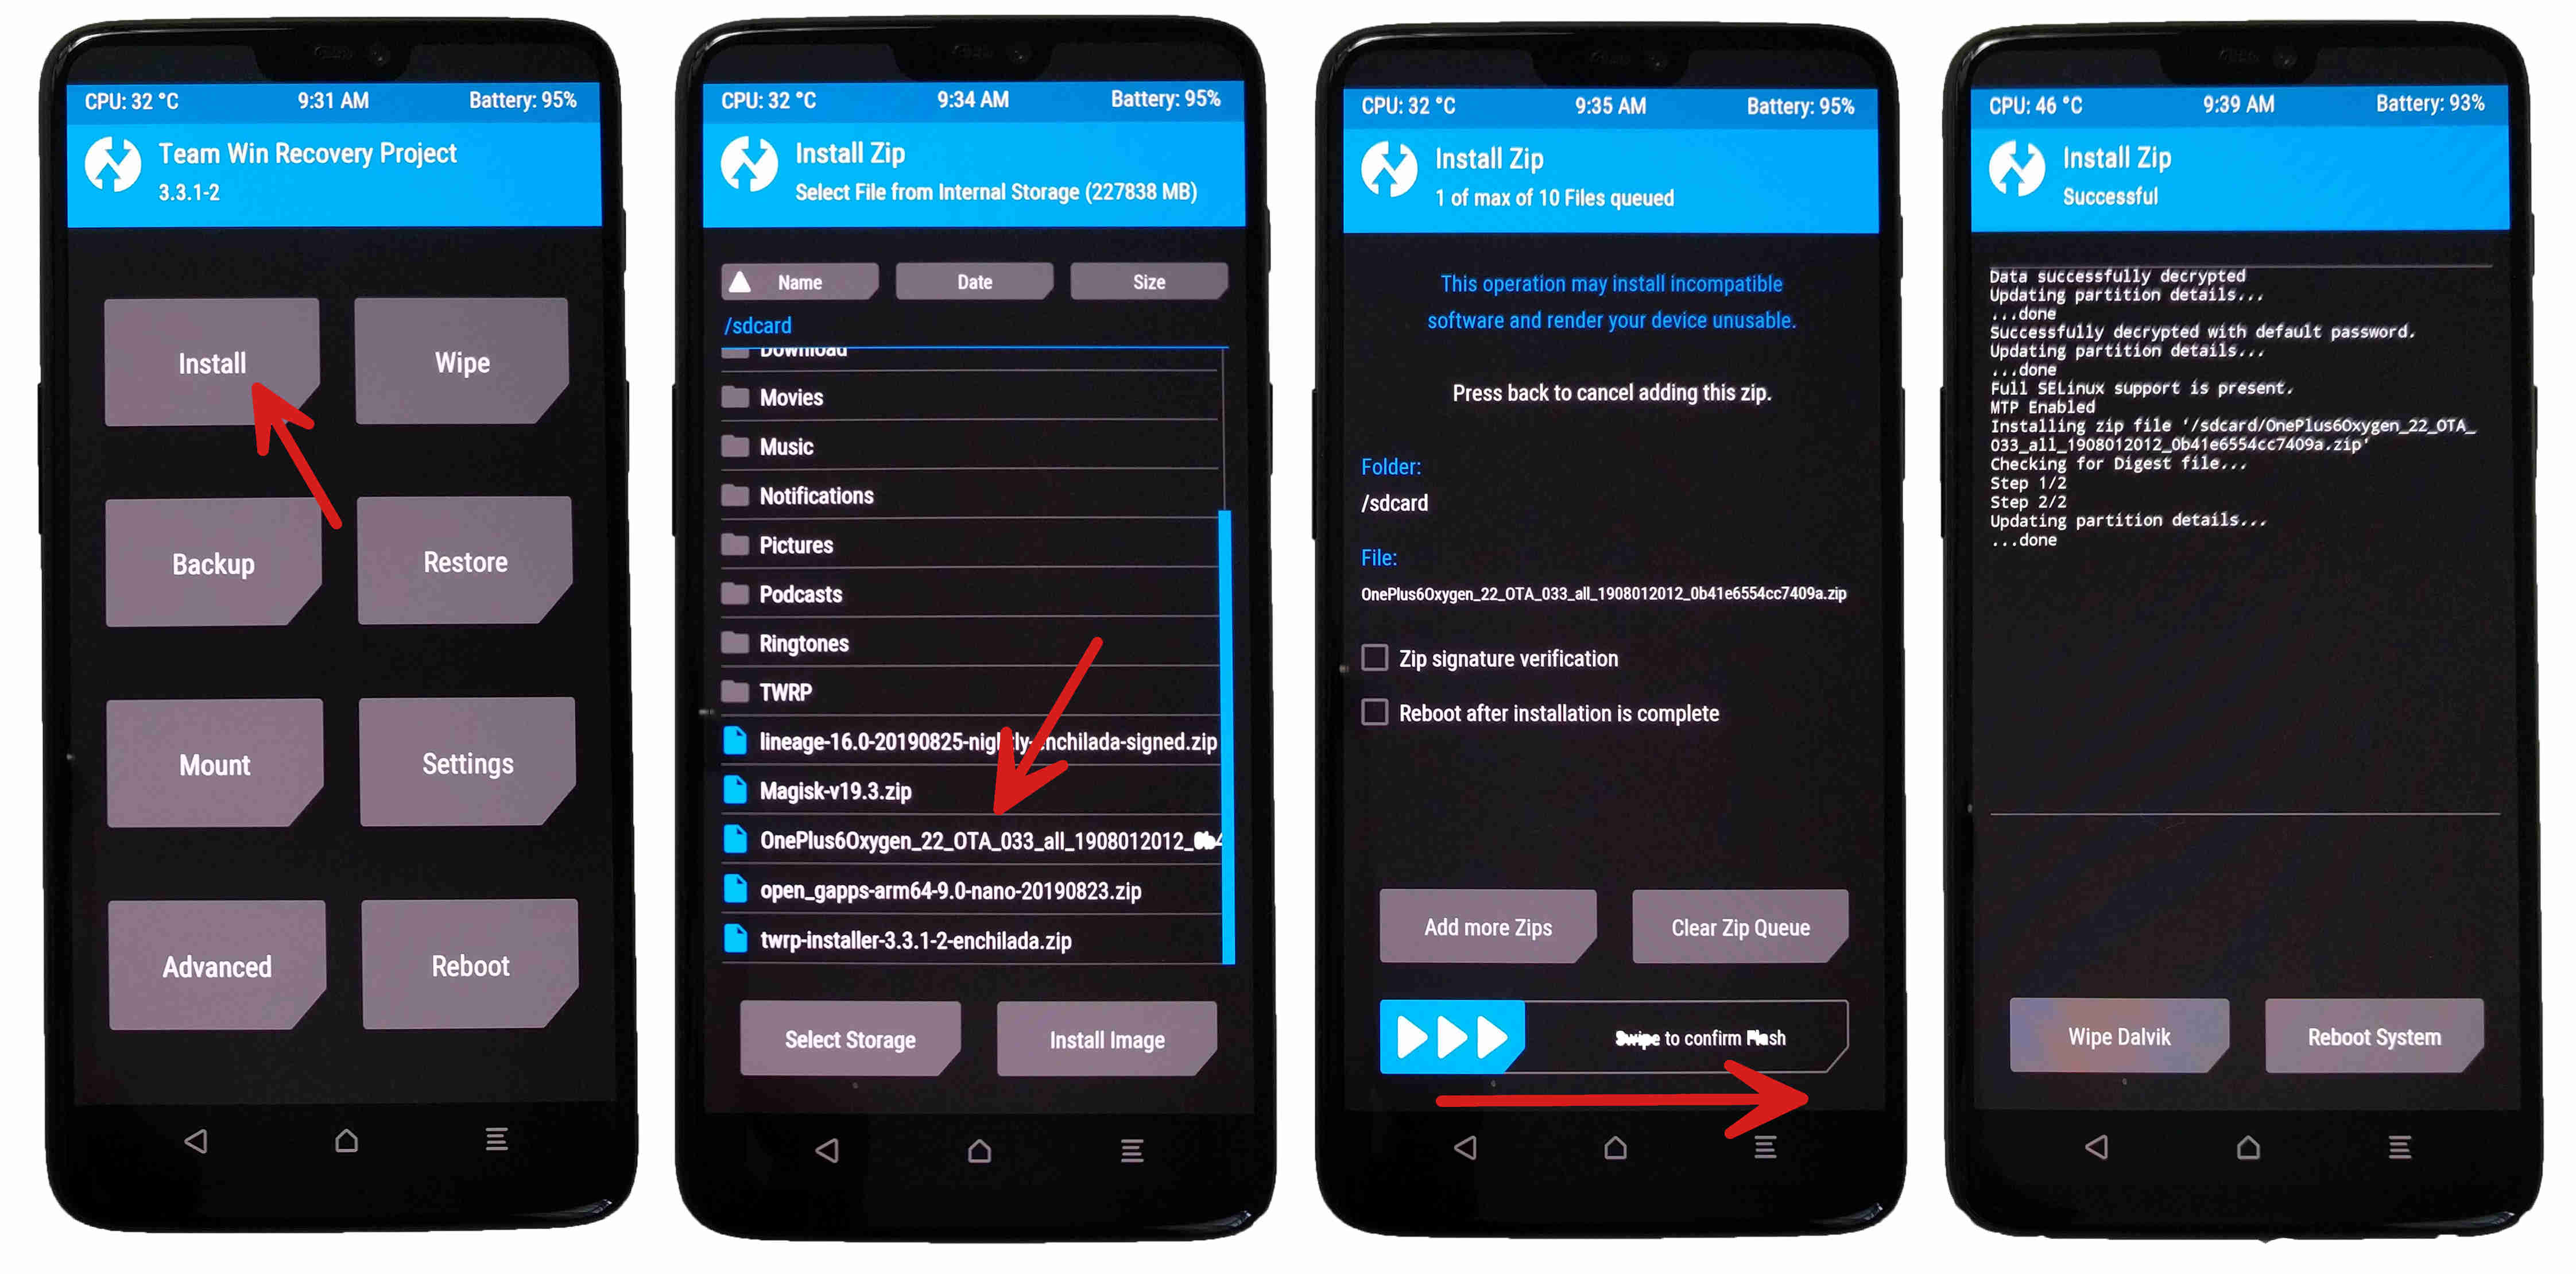
- Press Install
- Find the
OnePlus6Oxyzen_*.zipfile (under/sdcard) and press it- (Replace “
*” with the actual version you are using)
- (Replace “
- Swipe to confirm flashing
Now is a good time to stand up and stretch your legs, because this takes a while.
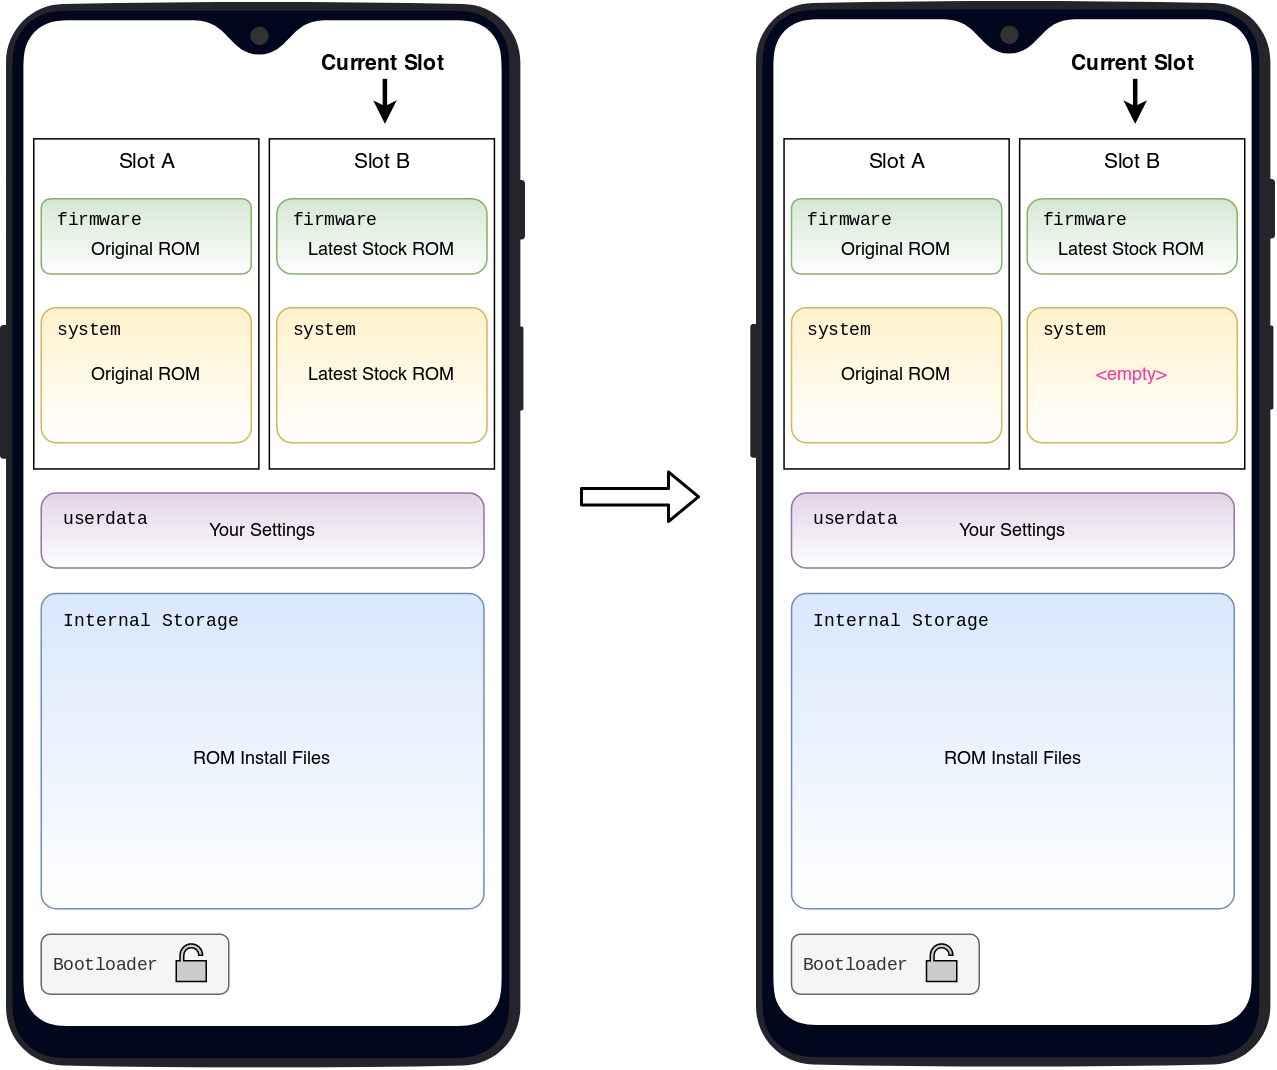
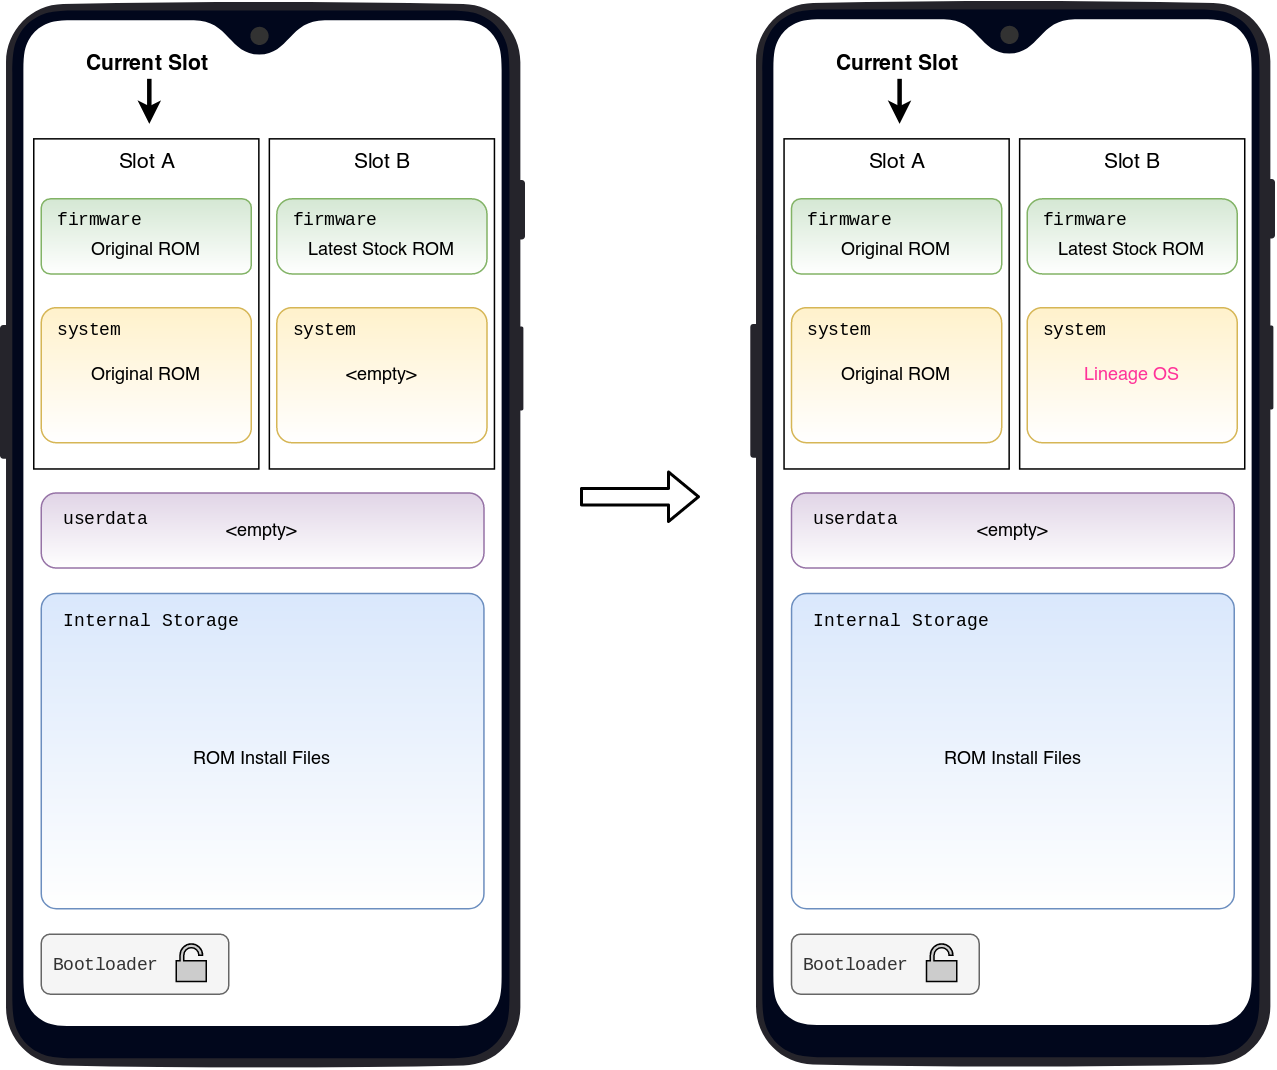
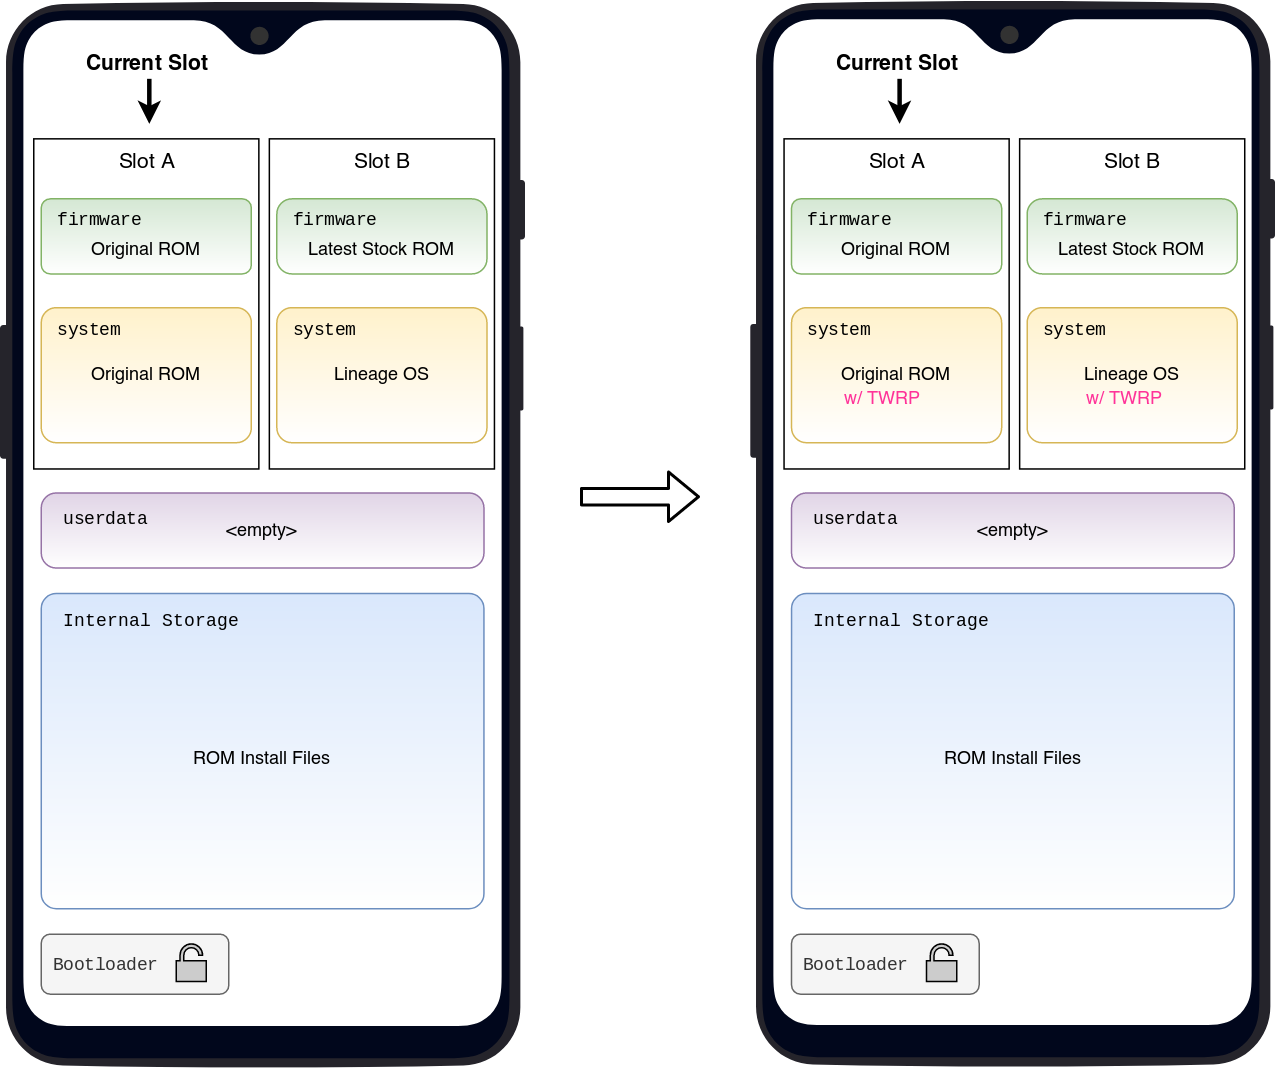
While you are waiting, let’s review what we just did. I find it helps to visualize the process, especially when it comes to flashing and A/B phones:
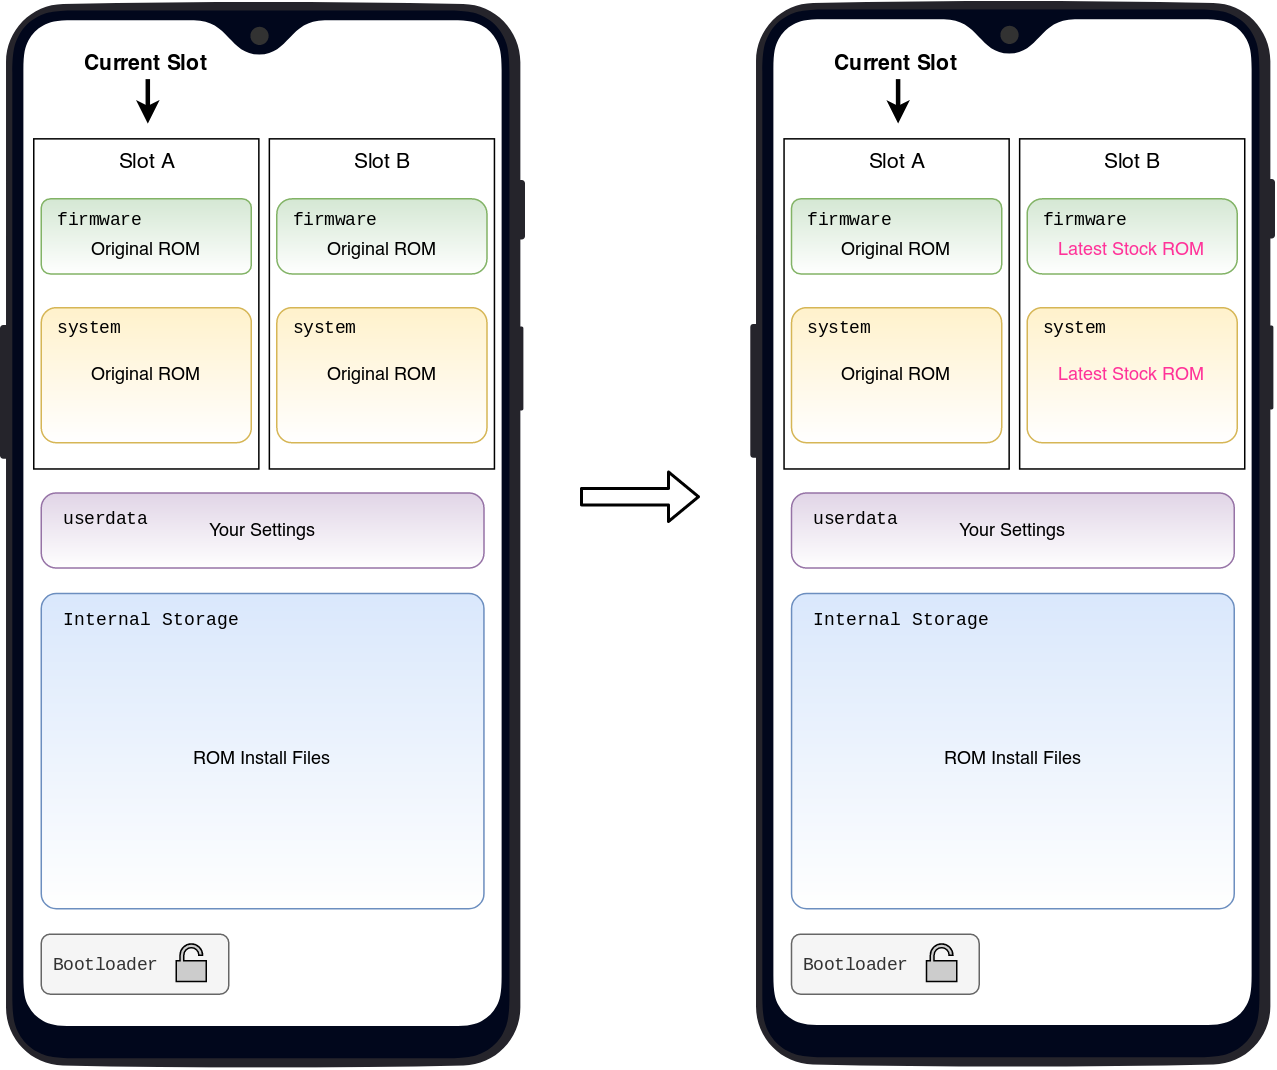
Note: depending on what updates have been applied to your phone, your active slot may start out as B instead of A. That is fine. If that is the case, just mentally flip the A and B slots in all diagrams for it to be correct. Do not try and swap slots to start the same as the diagrams. TWRP is finicky about A/B devices. It is easy to brick your device if you deviate too much from the instructions.
Flashing Older Versions
Depending on when in the future you attempt to follow this guide, it is possible that a newer version of the stock ROM has been released that is not yet supported by either TWRP or LineageOS.
If you get to step 9 and the latest version of TWRP recovery will not boot, you may have to follow the steps to recover a bricked phone. Then you can retry everything from step 1, except try flashing a previous version of the stock ROM, starting from the version just before the latest version.
If you get through all the steps in this guide but LineageOS will not boot, you can retry everything from step 6, except try flashing a previous version of the stock ROM, starting from the version just before the latest version.
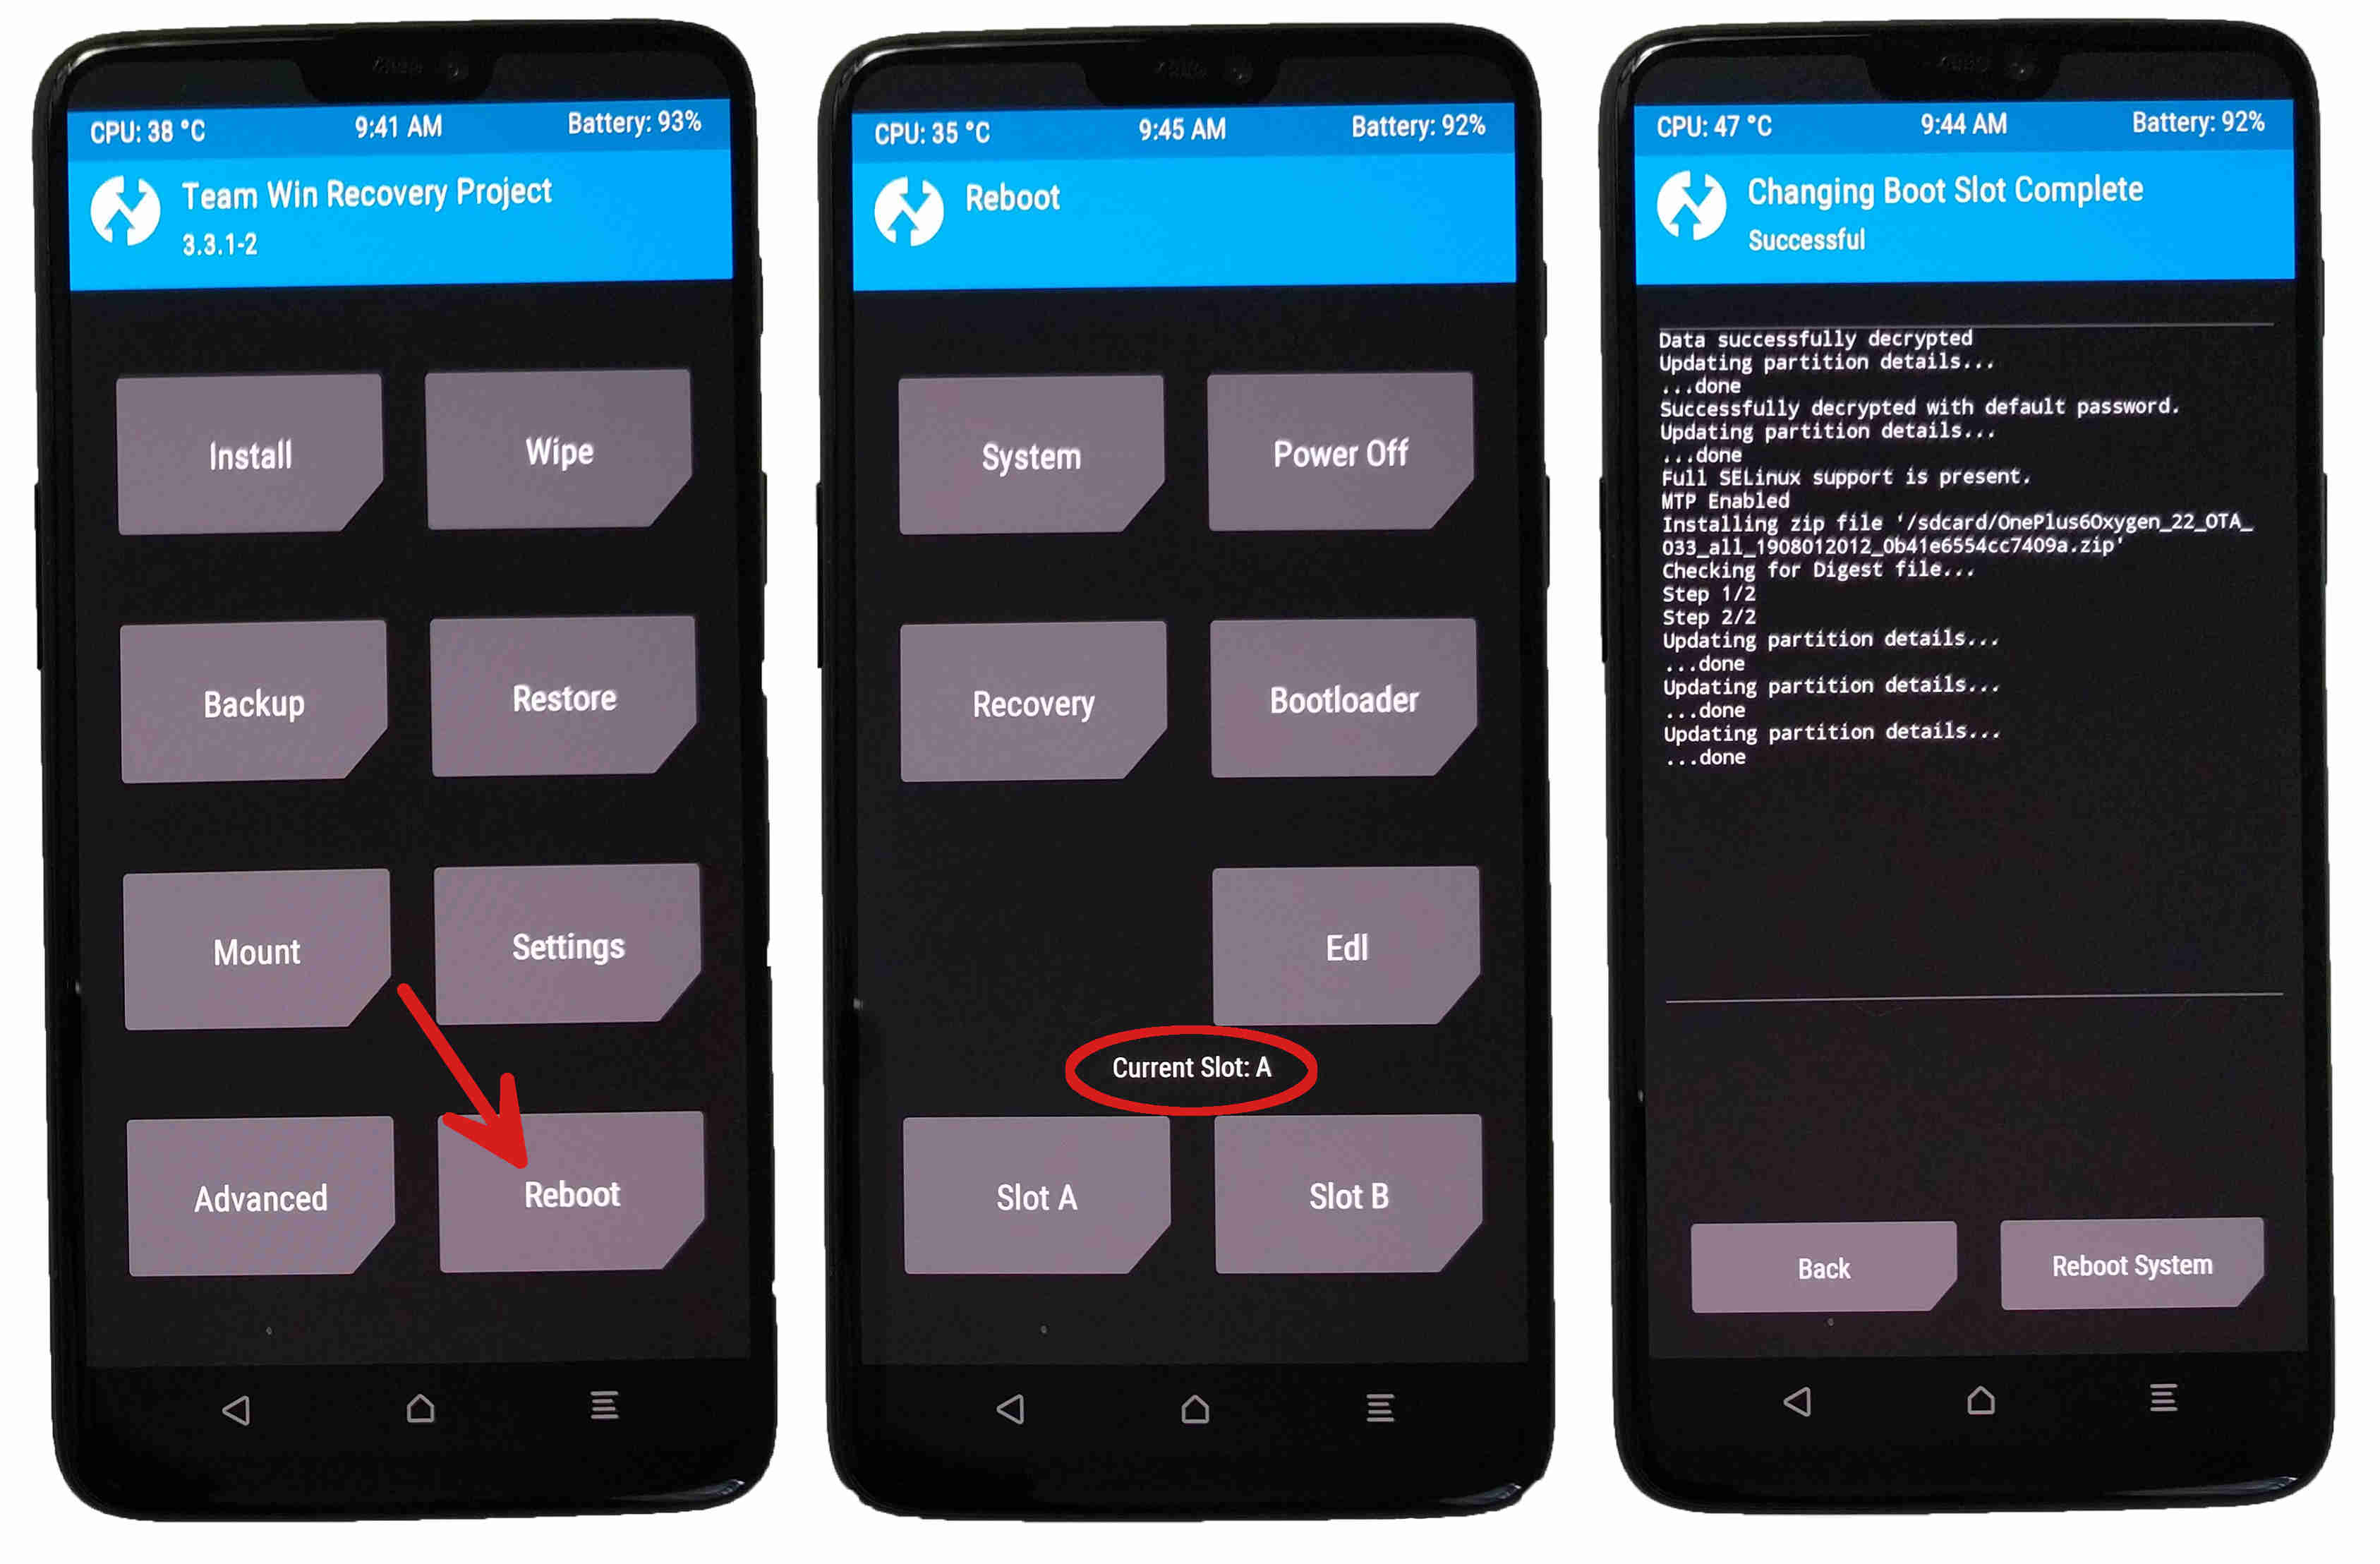
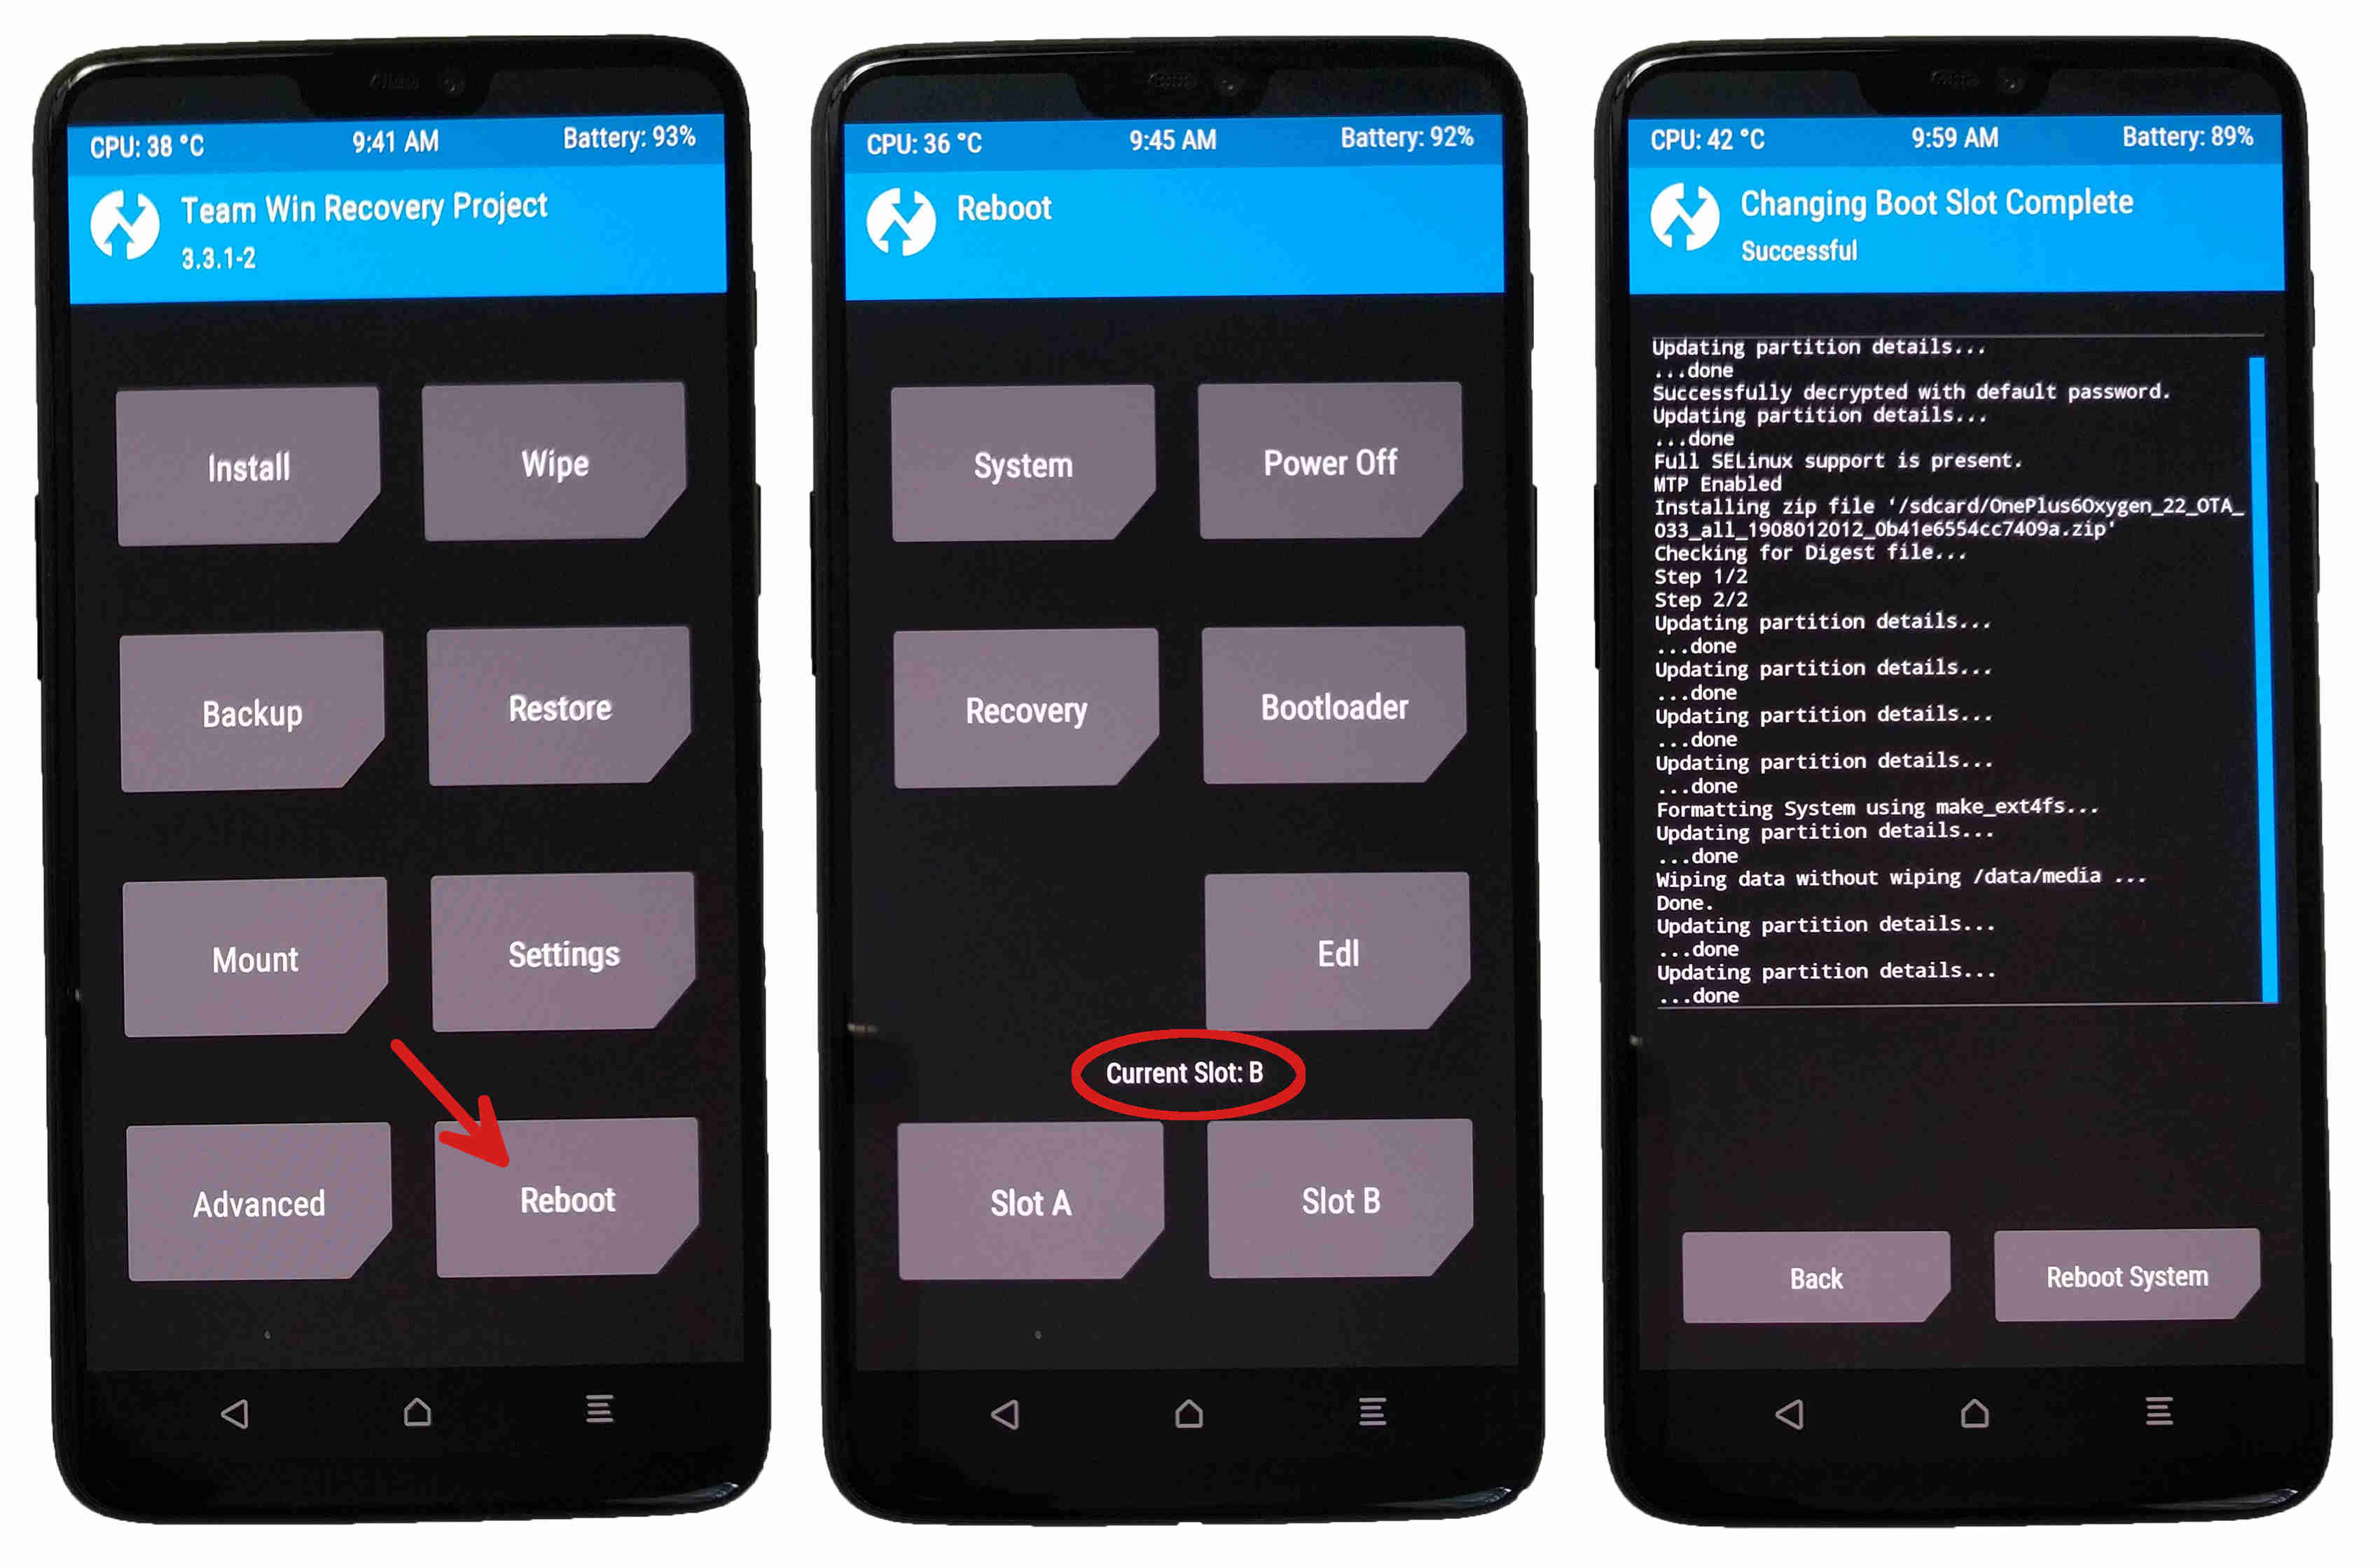
6. Swap slots
When you flash a ROM with TWRP, it is not the current slot that gets updated—instead the files get flashed to the non-active slot. This is the opposite of most other operations, so for example, wiping a partition takes effect on the current slot. If the stock ROM got flashed to slot B, then we need to set the current slot to B before we wipe the system partition in the next step (replace “B” with “A” if the stock ROM got flashed to slot A).
- Press Home on your phone
- Press Reboot
- Press the button corresponding to the non-active slot:
- Slot B if the current slot is A
- Slot A if the current slot is B
Do not reboot the phone (yet). The only reason we went into the Reboot menu is because that is where you swap slots.
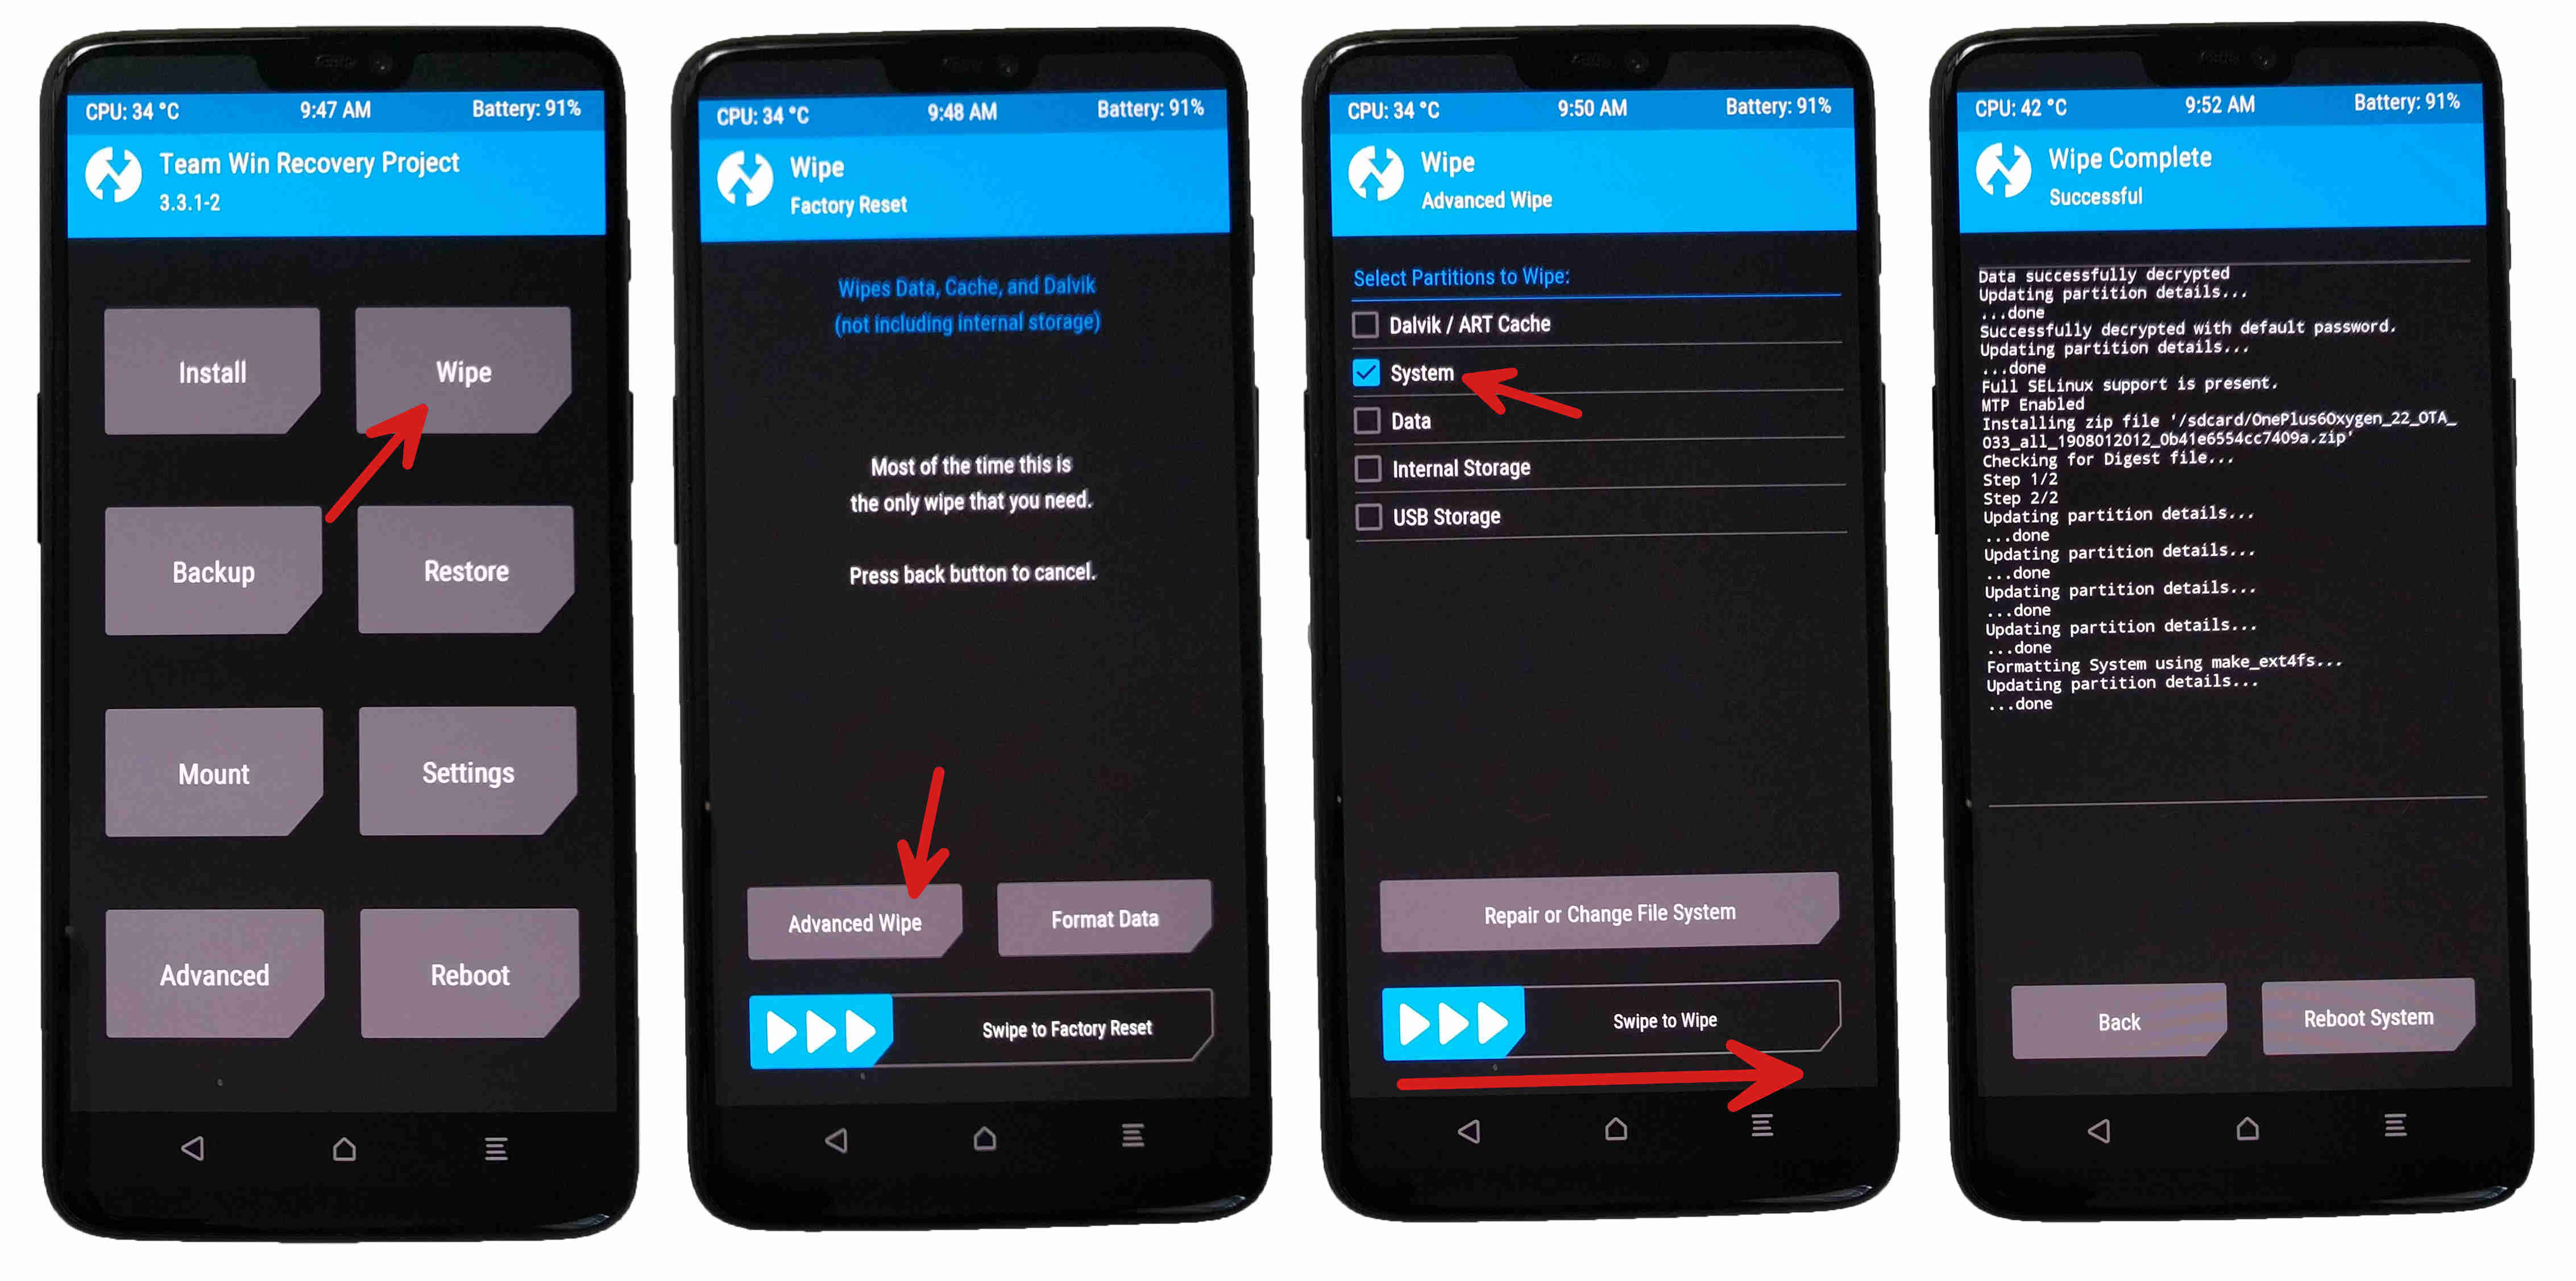
7. Wipe the system partition
You can usually get away with flashing LineageOS right over top of the stock ROM. However, this leaves files lying around from the stock ROM and is possibly error-prone. To keep things clean and avoid any issues, let’s erase the stock ROM files from one of the slots before installing LineageOS there:
- Press Home on your phone
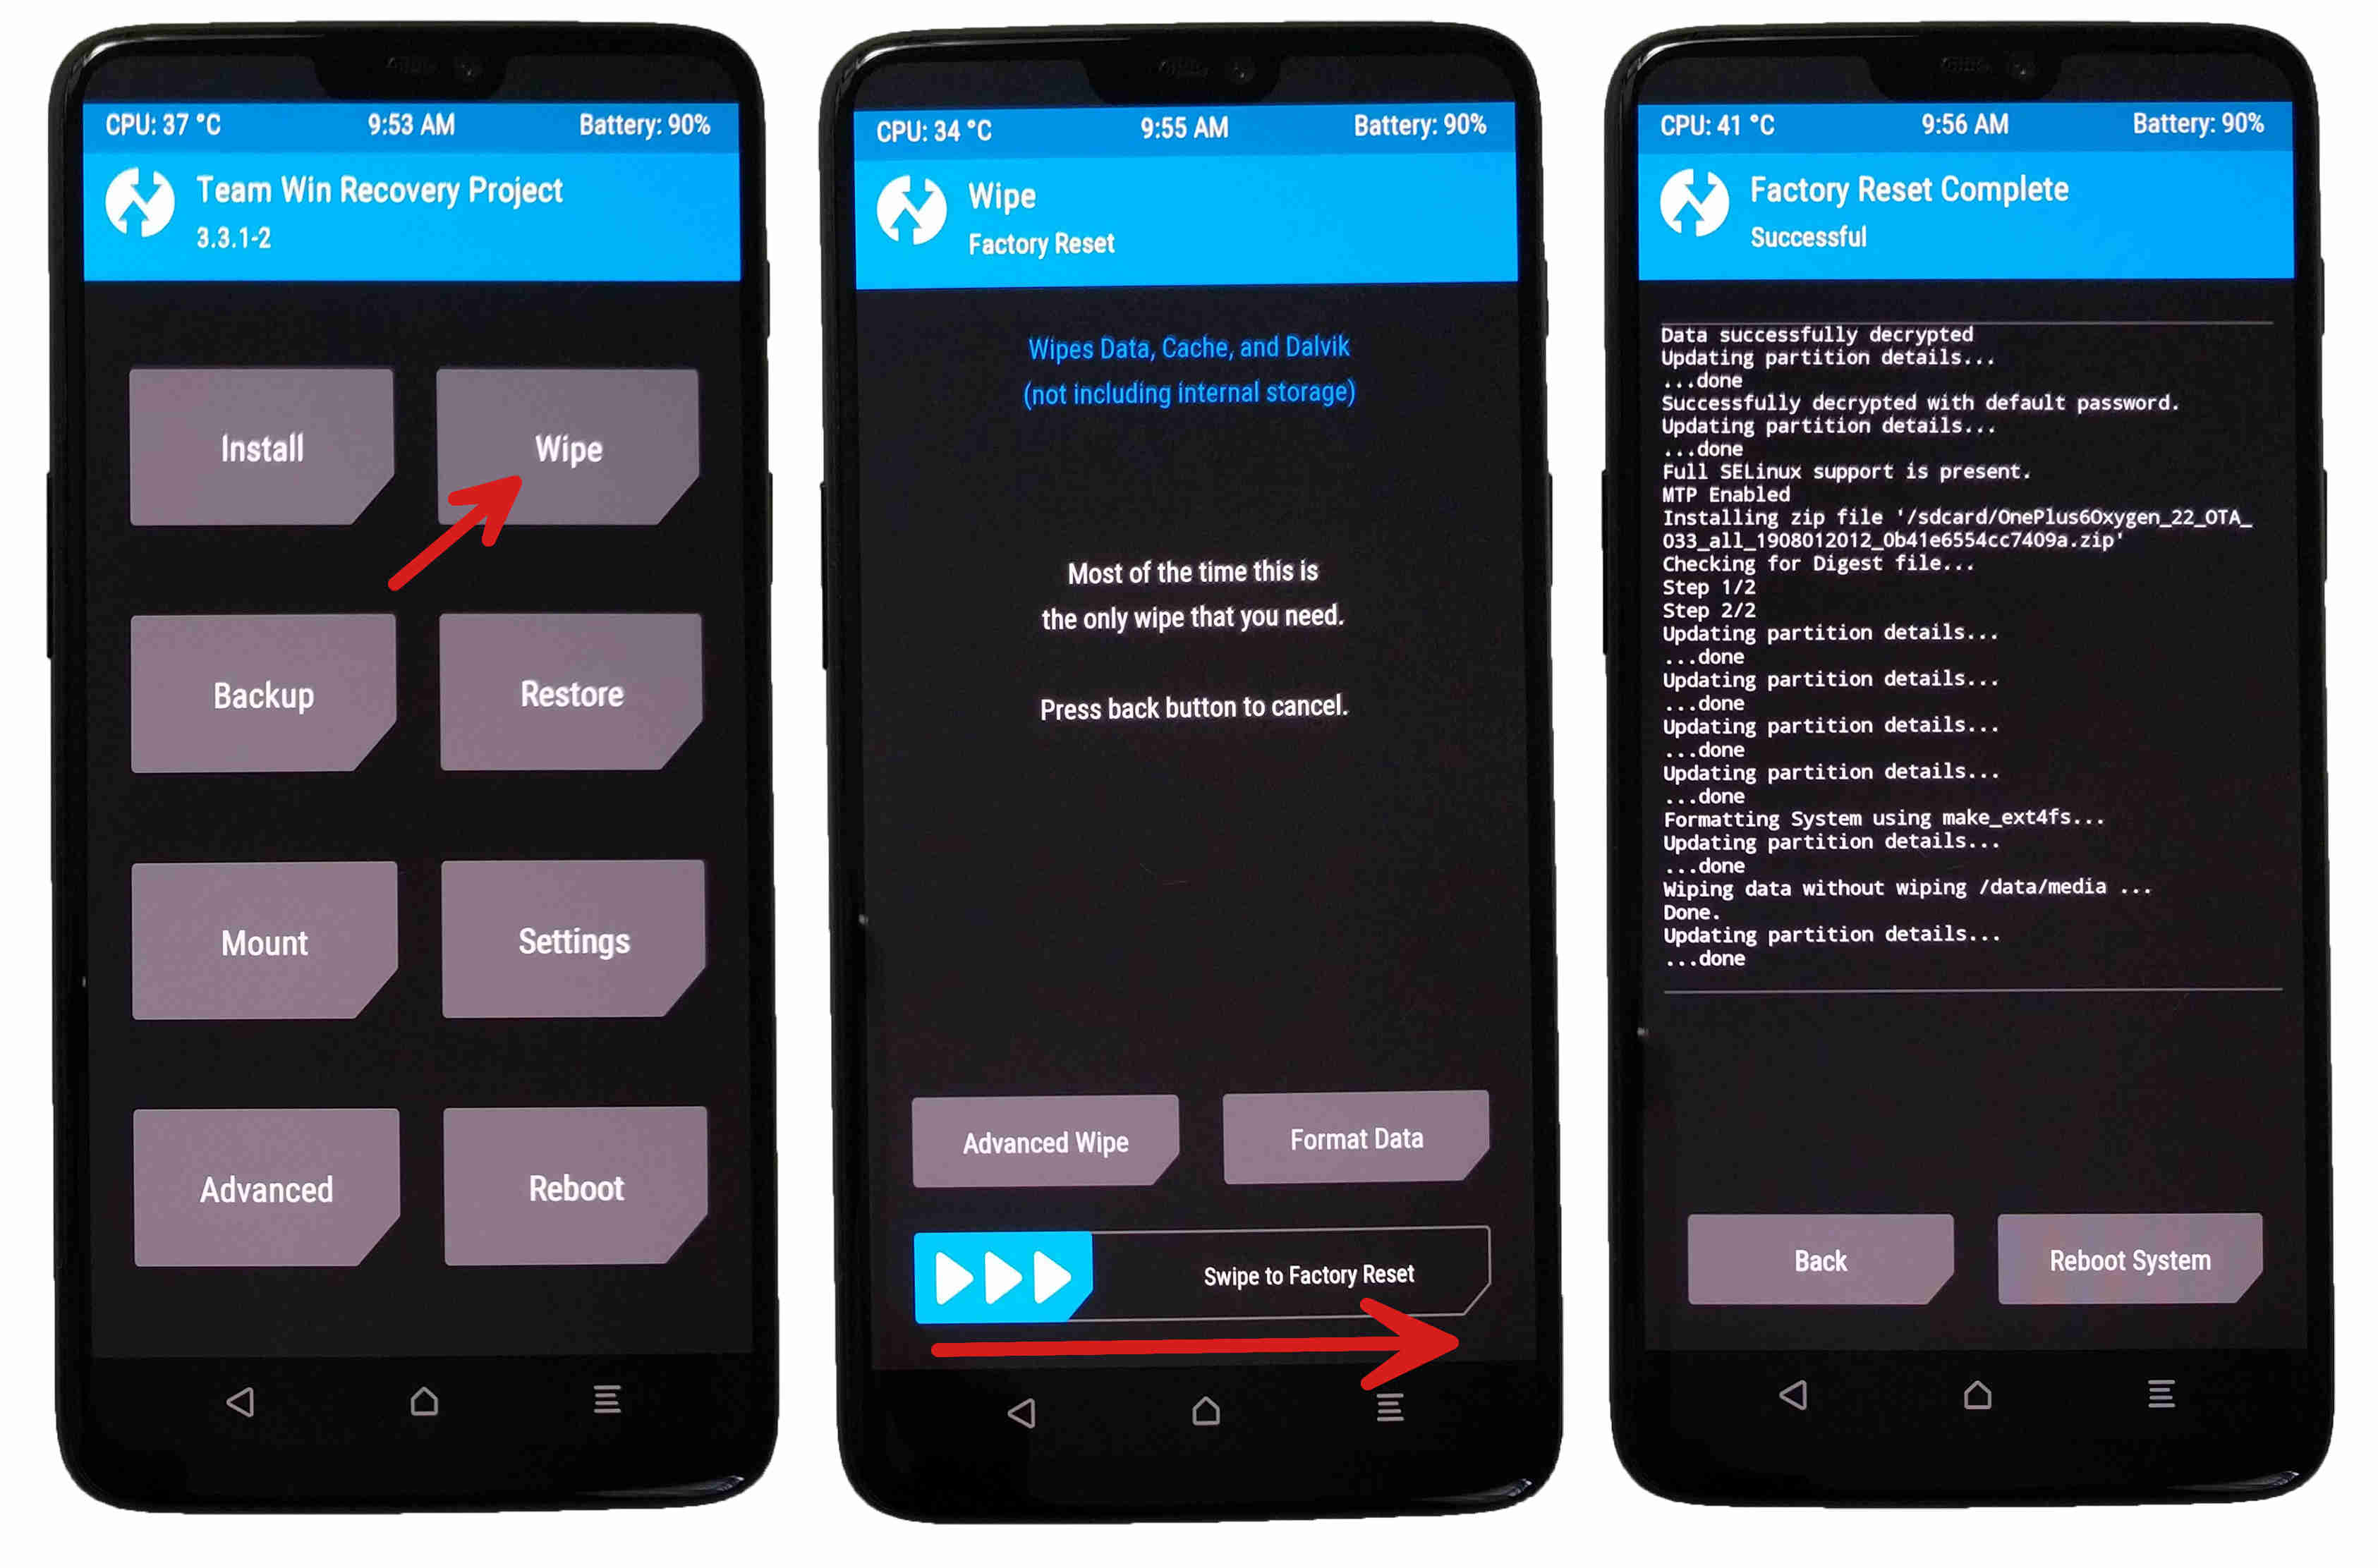
- Press Wipe
- Press Advanced Wipe
- Check the System partition (leave the rest unchecked)
- Swipe to confirm the wipe
Warning: Do not reboot your phone after wiping the system partition until you have flashed TWRP (step 10). Otherwise you run the risk of bricking your phone.
8. Perform a factory reset
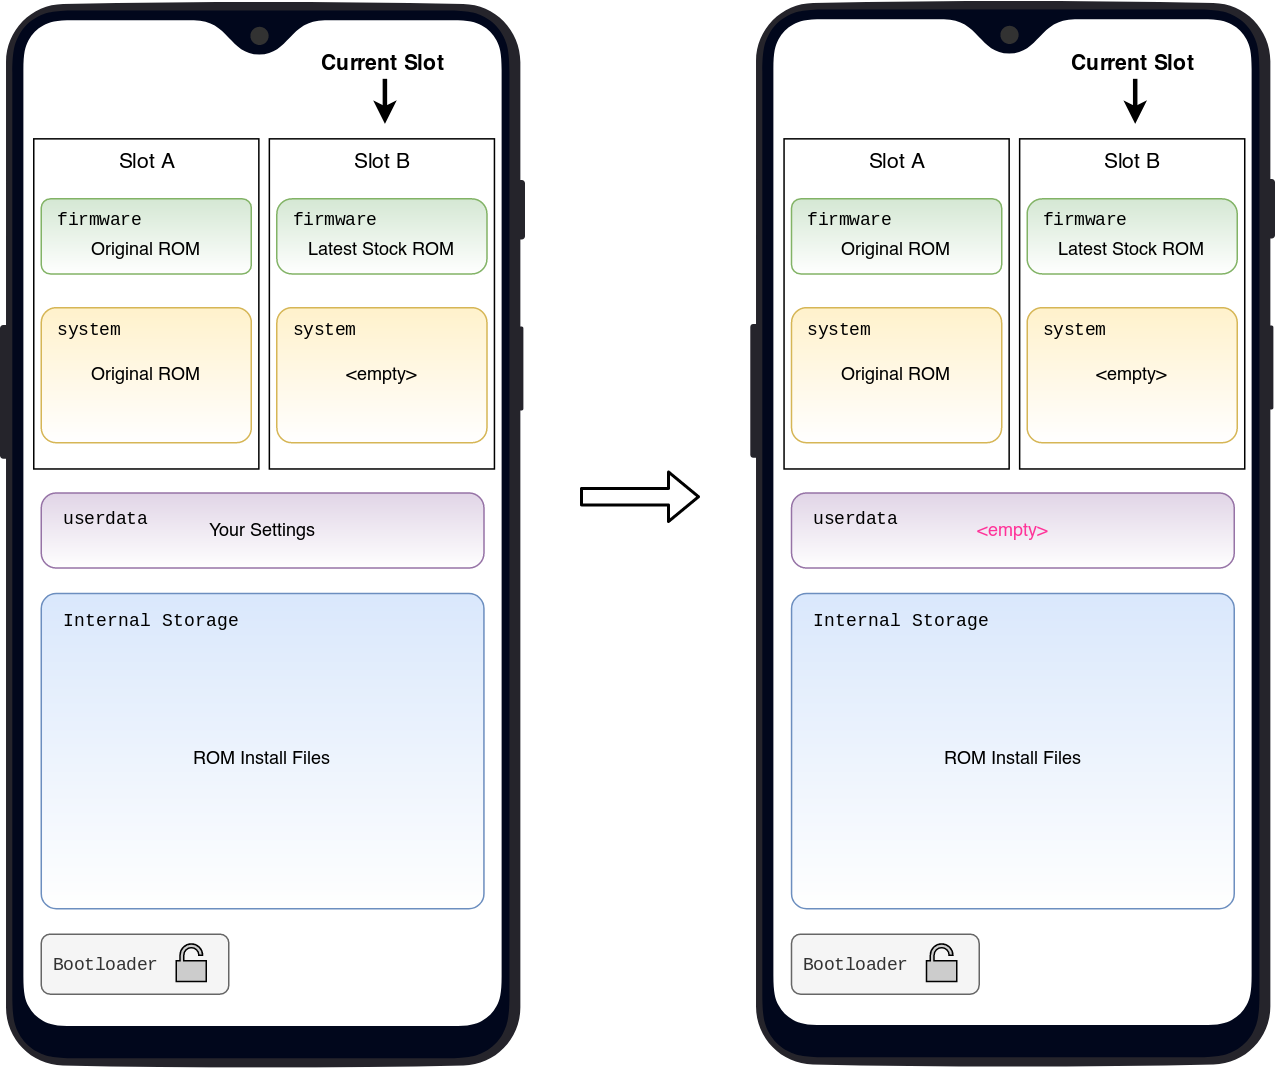
The userdata partition currently contains settings associated with the previous ROM. Settings from one ROM—as a general rule—do not transfer cleanly to a different ROM. We need to reset the existing settings to prevent weird issues:
- Press Home on your phone
- Press Wipe
- Swipe to confirm the factory reset
9. Swap slots
In the next step we will flash LineageOS. We want LineageOS to get flashed to the slot we have been doing all this work on (the current slot). Since TWRP flashes ROMs to the non-active slot, we need to switch the current slot again.
- Press Home on your phone
- Press Reboot
- Press the button corresponding to the non-active slot:
- Slot B if the current slot is A
- Slot A if the current slot is B
Do not reboot the phone (yet).
10. Flash the LineageOS zip file
All your hard work is paying off. Your phone is now ready to flash LineageOS.
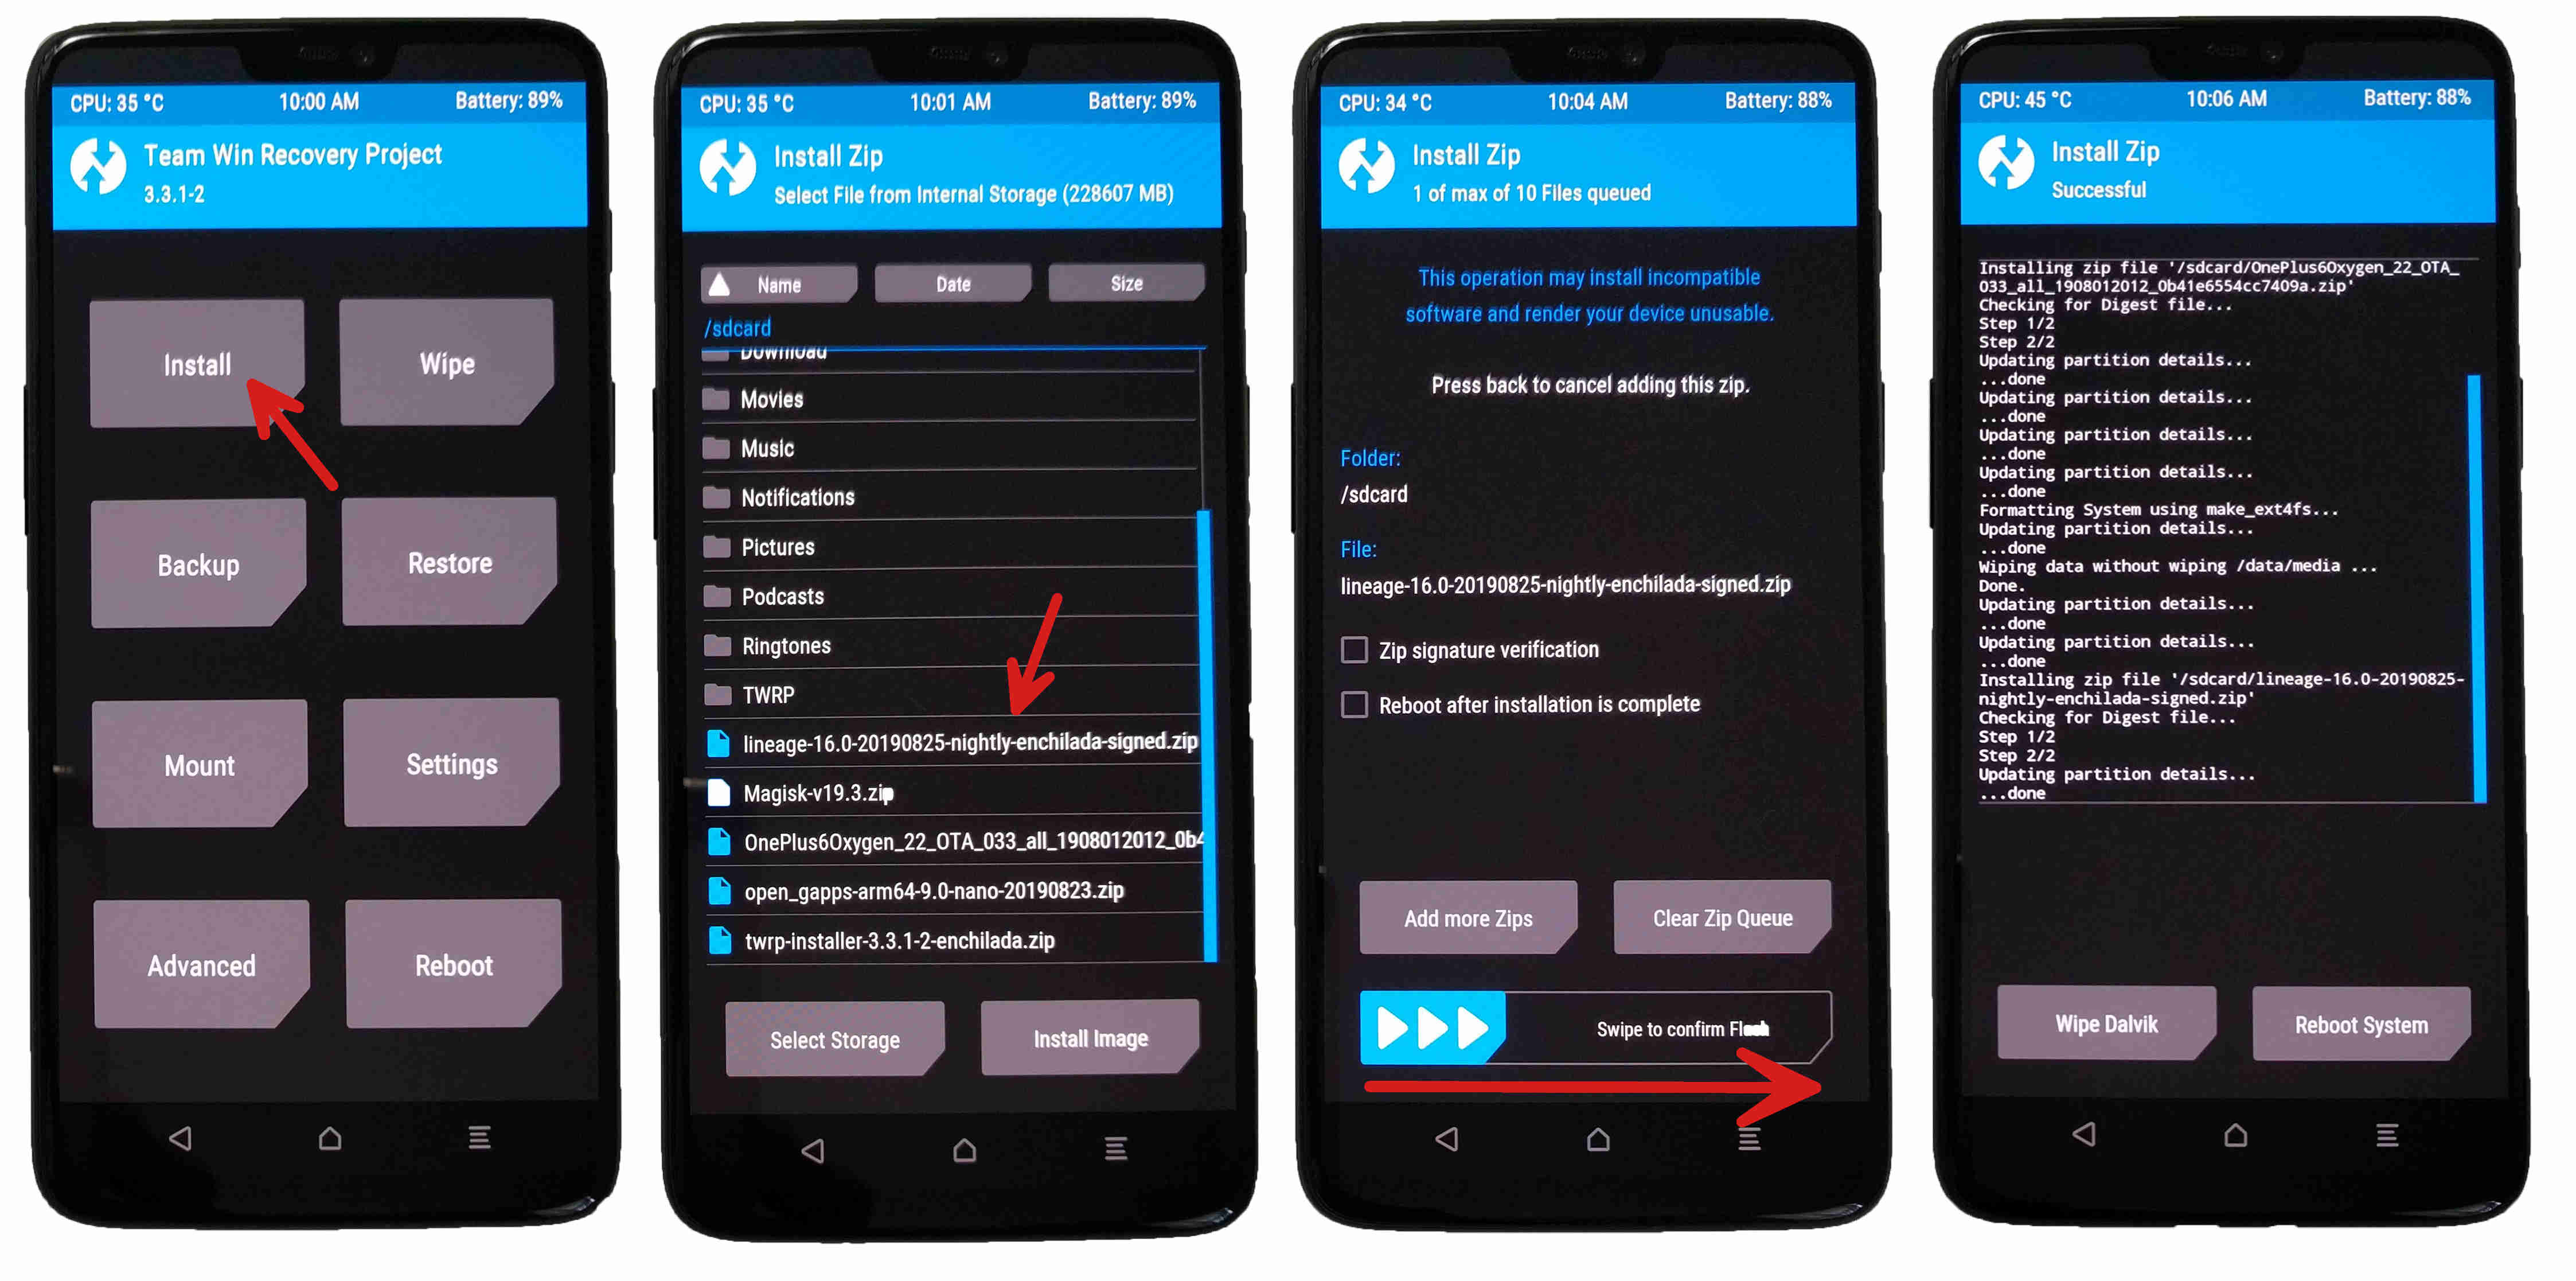
From TWRP on your phone:
- Press Home on your phone
- Press Install
- Find the
lineage-16.0-*-enchilada-signed.zipfile under/sdcardand press it - Swipe to confirm flashing
11. Flash TWRP
Prior to A/B devices, Android phones had a separate recovery partition that TWRP would get flashed to once, and then it would always be available from there. On an A/B device like the OnePlus 6, there is no recovery partition, which means any recovery software needs to rely on the system partitions to function. To avoid bricking your phone, you need to flash TWRP every time you make a change to either system partition.5
From TWRP on your phone:
- Press Home
- Press Install
- Find the
twrp-installer-3.3.1-2-enchilada.zipfile under/sdcardand press it - Swipe to confirm flashing
This will flash TWRP to both slots.
12. Reboot into Recovery
To be able to install GApps you need to reboot the phone back into recovery. (Swapping slots is not sufficient, and I don’t know why.)
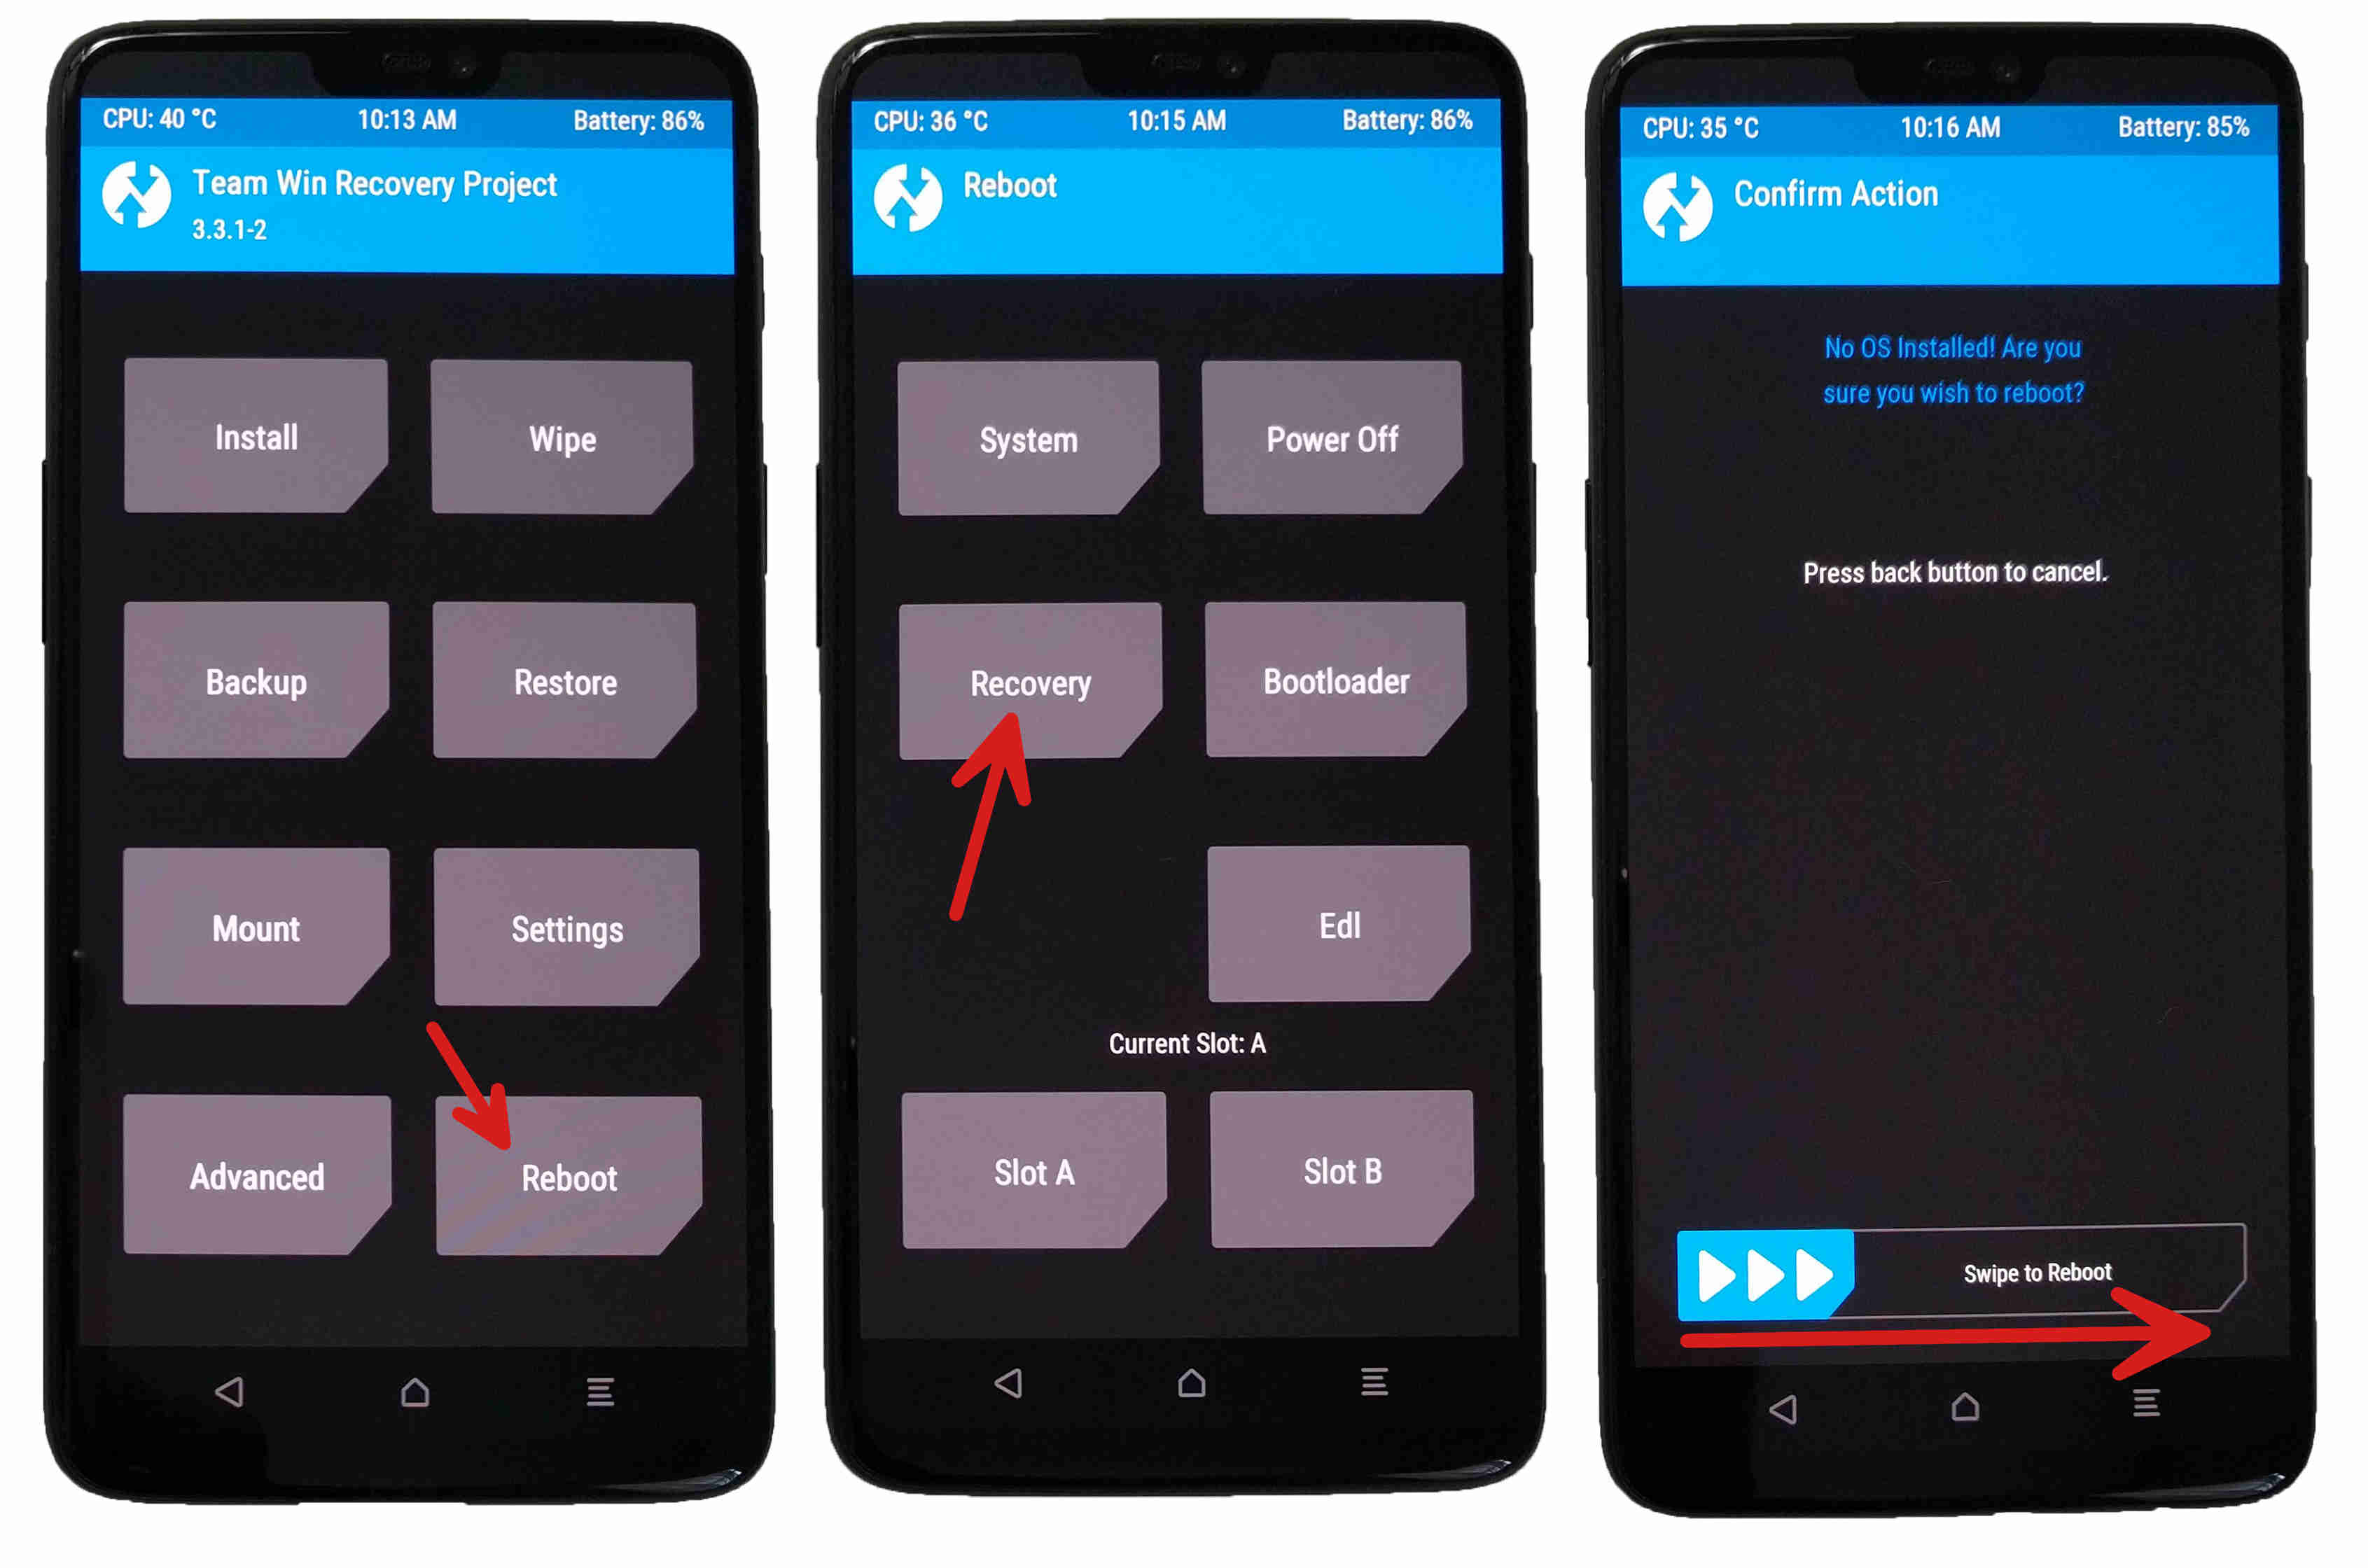
Now that TWRP is installed on the phone, we no longer need to use the fastboot method to get into recovery. Instead all we need to do is:
- Press Home on your phone
- Press Reboot
- Press Recovery
- If it warns you that no OS is installed, go ahead and swipe to continue
Note: when we reboot at this point, TWRP will implicitly swap slots for us. This happens whenever you flash a ROM file. Immediately before rebooting, TWRP sets the current slot to whatever slot the ROM got flashed to (regardless of any manual slot swapping you might have done). This only happens when you flash a full ROM (flashing GApps, for example, does not implicitly change the current slot). Although convenient, personally I find all this behavior confusing.
13. Install GApps
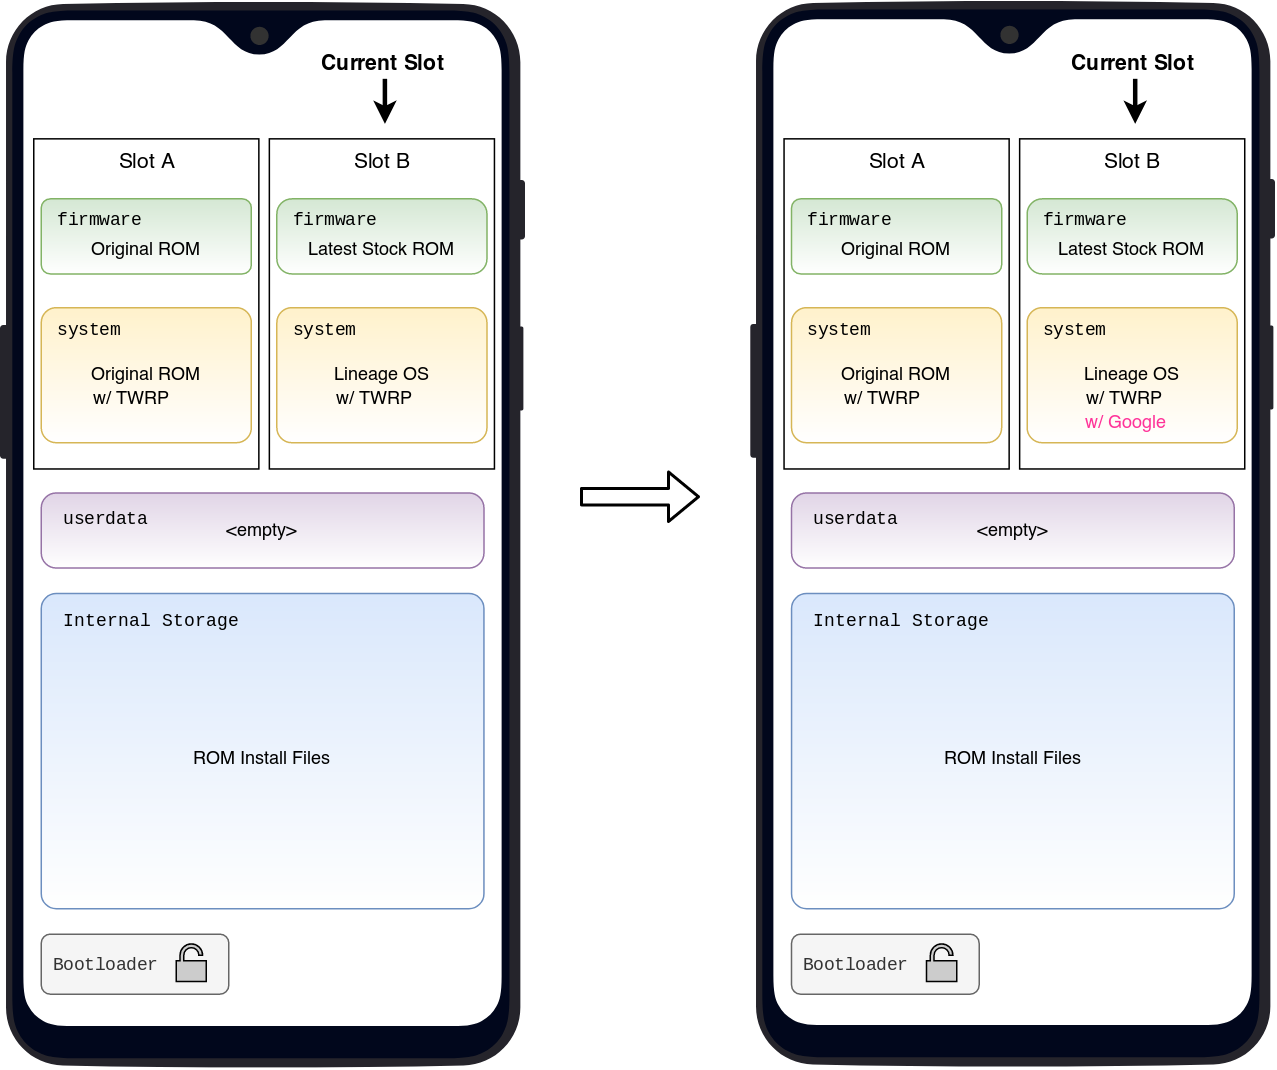
This step is optional. You do not have to put Google and the Play Store on your phone to have a perfectly functional phone. There is an open source alternative that you can install any time later (it doesn’t have to be flashed from TWRP).
However, if you do think you want the Play Store on your phone, it is best to install it now—before you start the OS for the first time.
The process should be familiar by now:
- Press Install
- Find the
open_gapps-arm64-9.0-*.zipfile under/sdcardand press it - Swipe to confirm flashing
If you get an error about an unsupported device, one possibility is that you didn’t reboot into recovery after flashing LineageOS. Another possibility is that you didn’t download the correct version of Google Apps—make sure you downloaded Android 9.0 for ARM64.
14. Install Root
This step is also optional. Indeed, there are good reasons you might not want to install root. Also, unlike GApps, you can safely install root at any later time.
Make sure to read the instructions for whatever root .zip you are using, but the procedure is generally the same:
- Press Home on your phone
- Press Install
- Find the su
.zipfile under/sdcardand press it - Swipe to confirm flashing
15. Reboot into the system
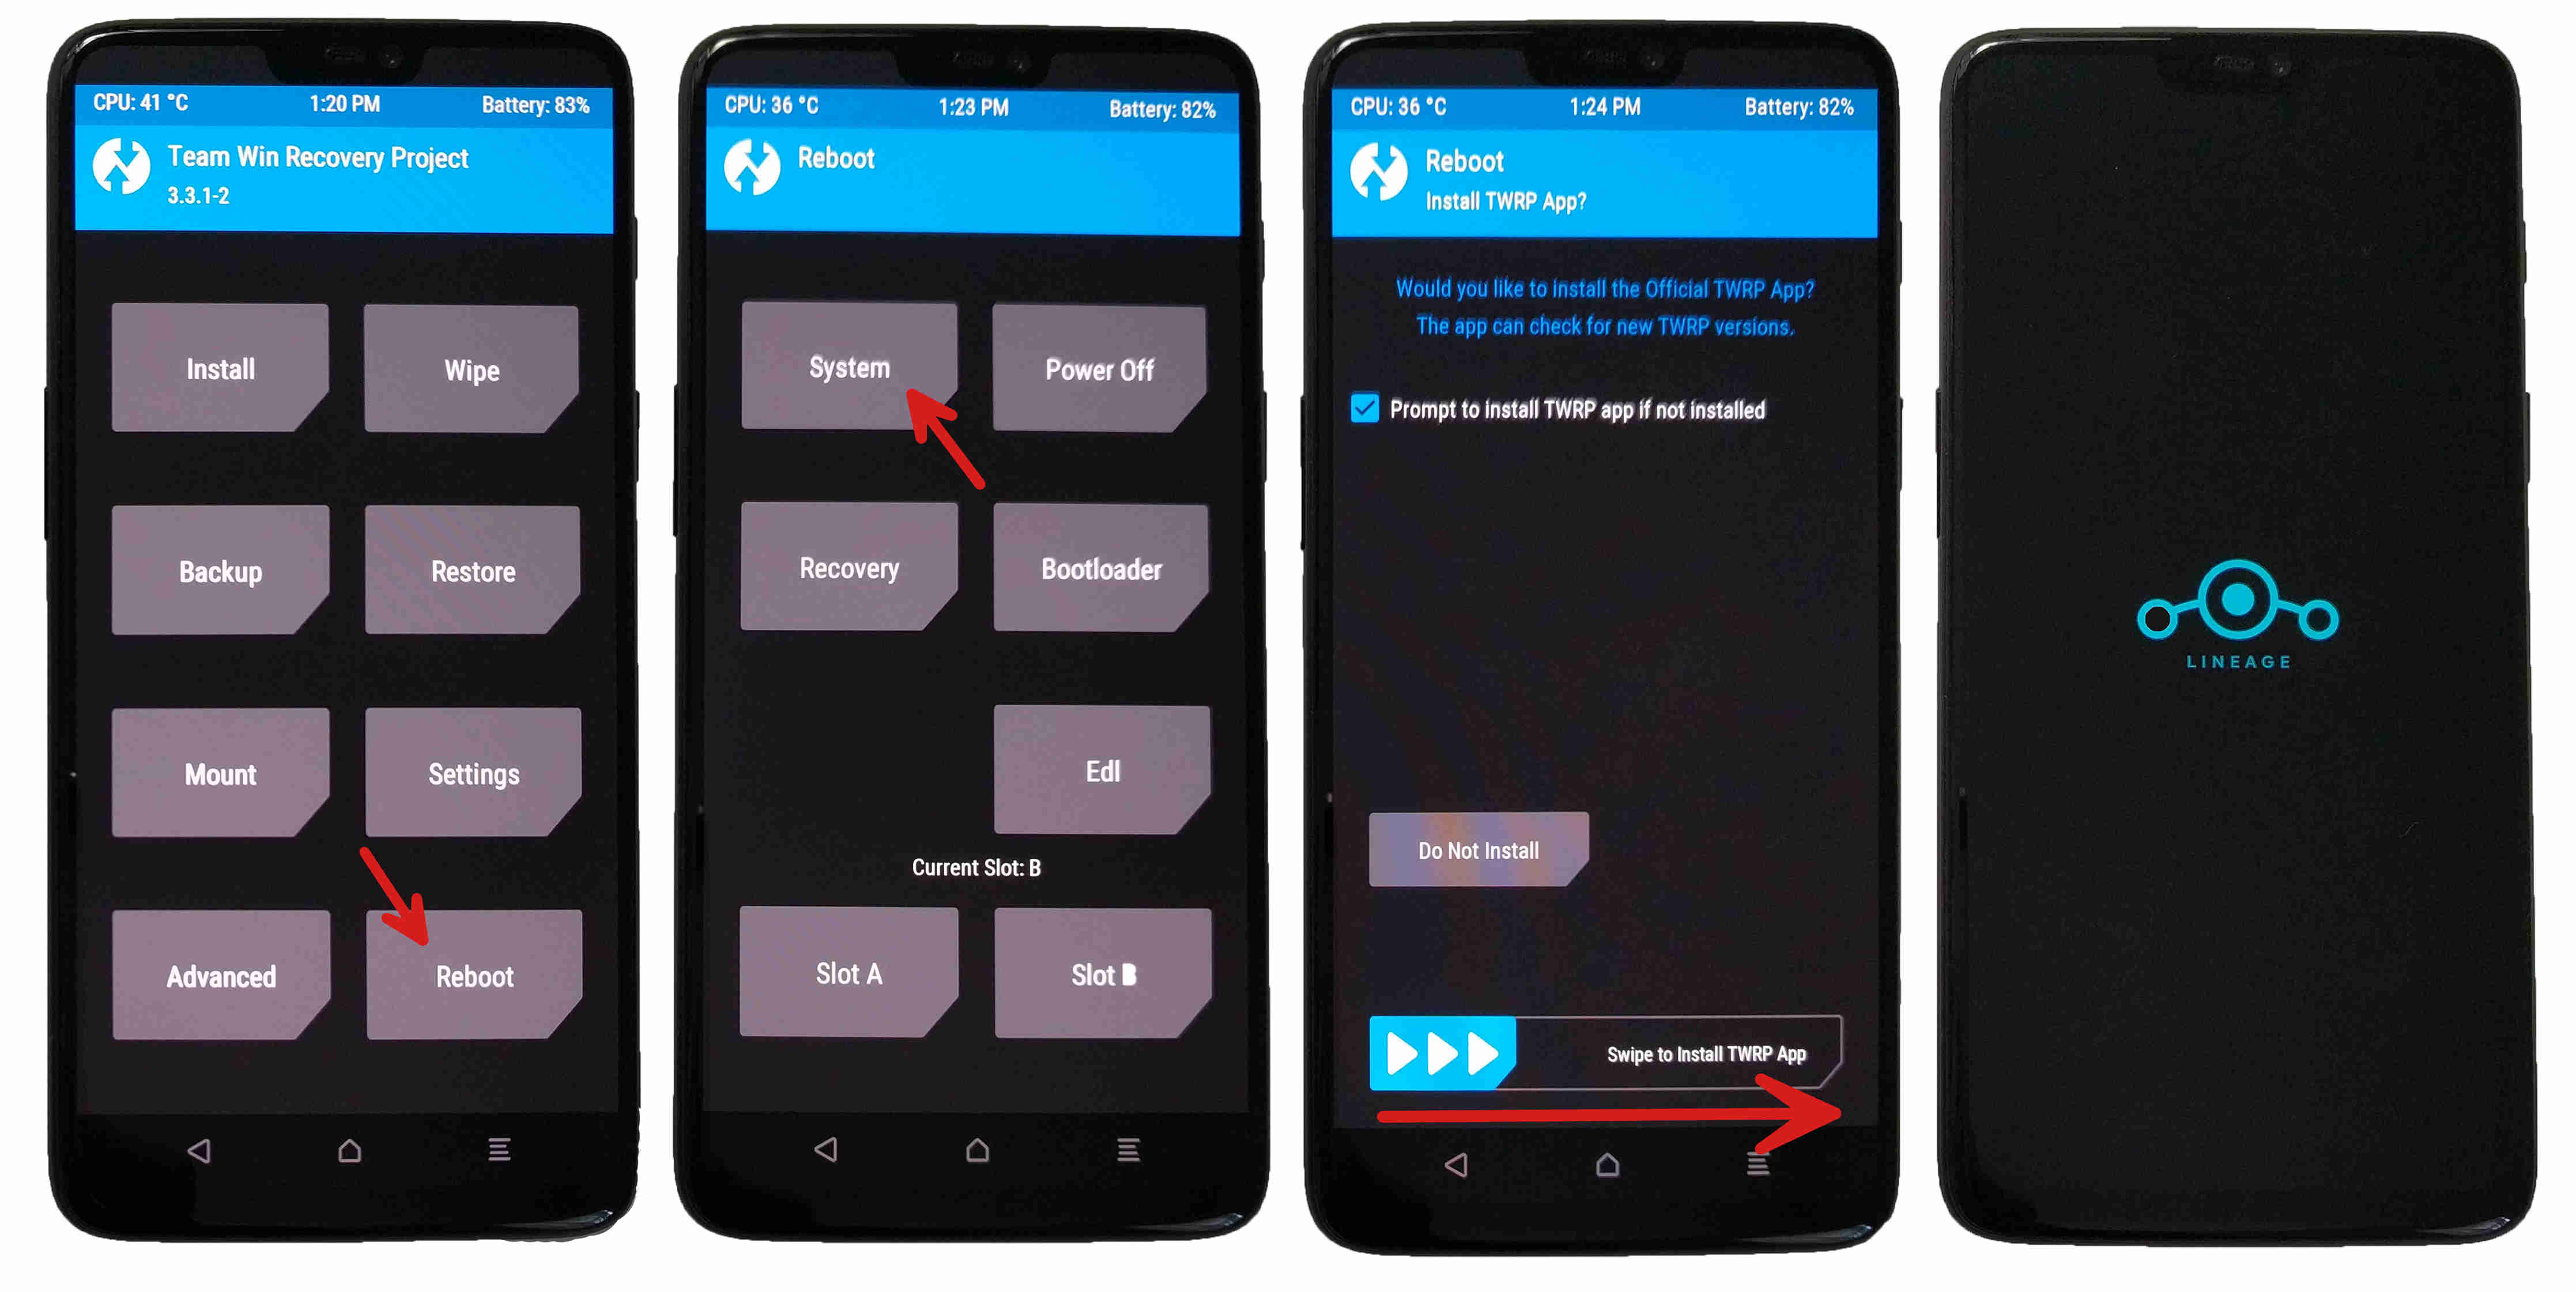
Congratulations, if you have made it this far you are practically done! The only thing left is to reboot into LineageOS and enjoy the open source life:
- Press Home on your phone
- Press Reboot
- Press System
If it prompts you to install the TWRP app, I recommend selecting Do Not Install. In theory it should be fine to install it, however a reader reported to me that when they tried it caused LineageOS to fail to boot. YMMV.
The only thing left to do is open a beverage and take a well-deserved break.
Assuming your phone starts up all right, you are done. The rest of this post is just troubleshooting steps and some flavor text.
Troubleshooting
If the phone doesn’t start up correctly, go back and read the instructions for flashing an older version of the stock ROM. If that doesn’t help, try an older LineageOS nightly in case there is a bug in the latest versions of LineageOS.
If the phone starts up fine but then has some sort of issue, you will need to look elsewhere for help. This guide only covers getting LineageOS installed. Check the official support thread to see if anyone has run into the same issue. You can also try asking on IRC.
Appendix: Rooting vs. Unlocked Bootloader vs. Custom ROMs
Many people think that flashing a custom ROM on your phone (such as LineageOS) means you are rooting your phone. However, the two are actually separate things. You can follow this entire guide and not root your phone once.
When you root your phone, you get unrestricted access to the phone after it is booted. This lets you do cool things that are sometimes not possible with an un-rooted phone (dumping WiFi keys, tethering, some fixes/workarounds). However, there are security implications to having full access to the phone when booted, so some people choose not to root their phone, even when running a custom ROM.
A custom ROM is software that lets you replace the operating system (OS) on your phone. You can think of the OS as all the software running on the phone that is needed to support running apps. Some of those apps come bundled in the ROM (like the phone dialer), while the rest you download through the Play Store or similar.
Note: technically speaking, ROM stands for “Read-only Memory”. The term originally referred to chips that were hardwired with the software logic for a given device. (Incidentally, game “roms” derive from this usage.) However, it wasn’t long before ROM chips became writeable. The meaning of ROM survives less as the “read-only” part and more as the “base software that controls a small electronic device” (like a smartphone).
We call it a “custom” ROM to distinguish it from a stock ROM—the ROM you get from the manufacturer/carrier that comes on your phone initially. Many (most?) custom ROMs are based on the stock ROM for your phone, but they come with all kinds of tweaks, and often strip out junk found in the stock ROMs. Some custom ROMs, like LineageOS, are based on the Android Open Source Project (AOSP), which is a basic starting point for any ROM and isn’t tied to a specific phone or stock ROM. That is why LineageOS comes bloat-free—it doesn’t have to find all the junk and strip it out… the junk isn’t in AOSP to begin with.
In order to be able to flash a custom ROM onto a phone and actually have it boot, you need an unlocked bootloader. The bootloader is a bit of functionality baked into the phone that is responsible for loading the OS/ROM when the phone is started. By default, most bootloaders are configured by the manufacturer to look at the installed ROM and check its signature to make sure it is one of the stock ROMs supplied by the manufacturer. As a security measure, if the bootloader detects any tampering with the stock ROM it will not allow the phone to start. This is inconvenient if we want to run a custom ROM. Thankfully, the bootloaders on some phones can be unlocked, to allow it to start any ROM regardless of signature.
Just to make things more confusing: when people (typically in the US) say they have an unlocked phone, they usually aren’t referring to having an unlocked bootloader. Instead they are referring to a carrier-unlocked phone, meaning they can have a phone on, say, AT&T and switch over to T-mobile, or use it abroad, or whatever.
Appendix: A/B Slot Devices
The OnePlus 6 is an A/B slot device. The “A/B” part describes how it works under-the-hood. However, even if you aren’t familiar with the term “A/B”, you may have heard of the feature under its marketing name—”seamless updates.”
To understand what an A/B slot device is and what makes its updates “seamless”, it helps to know what came before. Old Android devices had a single system partition that the Android OS was installed to. (What is a partition?). Under normal circumstances, a single system partition is all you need to run the device.
Things get tricky, however, when it comes time to update the version of Android OS installed. Do you really want the running OS to rewrite the system partition on the fly while you are using it? Even if it was conceivably possible, what happens if something goes wrong halfway through the process? For all these reasons, old Android devices would perform OS updates by rebooting into a separate, minimal OS—recovery mode—dedicated to performing system updates.
Using recovery mode to perform OS updates works well… except for one big drawback—the user has to reboot their phone and wait for the update to complete. Users in general hate the inconvenience of rebooting their phone, especially for a slow update. So what if there was a way to update the system partition while the phone was running, but do so safely?
Enter seamless updates. If an Android device had more than one system partition, an OS could run from one of the system partitions and flash updates to another (inactive) system partition. Then, at any future point, the active system partition could be switched to the updated one by performing a quick reboot. In practice, you only ever need two system partitions, because the active one can update the inactive one and then you flip the two.
By convention, we call the first system partition “slot A” and the second one “slot B”. Hence, an A/B slot device.
Note: each slot contains more than just a system partition. There is also a firmware partition associated with each slot. (What is firmware?) So what it actually looks like is you have system_a, bluetooth_a, modem_a, etc. partitions, and you also have system_b, bluetooth_b, modem_b, etc. partitions. This does not apply to all partitions on the device. Many partitions are shared by both slots. So, for example, there is only one userdata / “Internal Storage” partition, and it is used whether the device is running on slot A or slot B.
TWRP and A/B Slot Devices
TWRP has special behavior on A/B devices to try to be helpful… although personally I find it to be more confusing than helpful. When you install a .zip file with TWRP, it will flash the .zip file to the non-active slot, then automatically switch the active slot when you reboot.
I am not 100% sure how the automatic slot swapping behaves after you have manually swapped slots from the Reboot menu. The procedure outlined in this post works. I have tested it many times. However, I have seen weird behavior when doing a lot of slot swapping and then flashing .zip files. Perhaps someone who is familiar with the TWRP source code can clarify it.
Appendix: Booting TWRP vs Installing TWRP
When you use the fastboot tool from your computer to start TWRP, you are sending a temporary copy of the TWRP software over to the device. It stays in memory as long as you are within TWRP, but as soon as you restart the device, it disappears.
To get TWRP to be installed on your device, you first have to boot the .img temporarily. Then once you are in TWRP, you can flash the TWRP install .zip. This copies the TWRP software to both system partitions. That way, whether you are on slot A or slot B, you will be able to boot the device into TWRP.
A word of caution: because TWRP gets installed onto the system partition—the same place LineageOS gets installed to—every time you update LineageOS you will overwrite the TWRP software installed on the slot. Thankfully, LineageOS comes with its own recovery software for A/B devices, so you aren’t completely without recovery software after updating. Still, it is not as good as TWRP, so it can be slightly annoying.
Appendix: Format the Data Partition
If your device was already unlocked before step 2, or if you enabled device security when you booted the stock ROM in step 3, I recommend formatting the data partition on your phone. This will remove any device encryption (which will interfere with the installation) and put your phone in a totally clean state.
Warning: when you format the data partition, any and all data you put on the phone will be erased.
First, boot your phone into TWRP recovery by following the instructions in step 4. Then from the TWRP home screen:
- Press Wipe
- Press Format Data
- Type “yes”
- Press the check mark to continue
Note: after formatting the data partition, TWRP gets buggy until you reboot. Don’t try and do anything more in TWRP at this point.
Where To Continue
If you were on:
- Step 2 (Unlock the bootloader) → proceed to step 3
- Step 3 (Transfer ROM files to the phone) → go back and repeat step 3
Appendix: LineageOS and Stock ROM Versions
There are various proprietary bits that need to be present on your phone for it to function fully. Making a phone call and connecting to Bluetooth devices are two examples of such functionality. You get the proprietary bits by installing the “firmware” that comes as part of the stock ROM.
LineageOS relies on the presence of that firmware to function. Because the code in the firmware can change from update to update, the version of LineageOS you install needs to be paired with the version of the stock ROM you last installed. In practice, this means flashing the latest stock ROM before you install the latest version of LineageOS.
Appendix: Partitions
The OnePlus 6 comes with a single storage device. Underneath the hood, you can think of a storage device like one long list of cubby holes, each of which can hold a certain fixed amount of data. You may be aware that storage devices are usually managed by a filesystem. The filesystem is responsible for figuring out that your “herp” file goes in this cubby hole, the “derp” directory in that one, and your big “flerp” file goes in these cubby holes over here. Partitions serve a similar purpose, but are way more basic. Filesystems are smart and can split a large, growing file across different parts of the storage device, depending on where space is available. Partitions are dumb. When a storage device is split into partitions, the size of each partition is fixed ahead of time and never changes. Your system partition is 2 gigabytes, but the OS only takes half of that? I guess the rest of that space is wasted. The opposite can be even worse: your system partition is 2 gigabytes, but the system update needs more space than that? No way you are going to be able to apply that update, not without re-imaging your whole device from scratch.
")
Even though I described filesystems and partitions as fulfilling a similar purpose, it is not an either/or thing. Android devices use both. At a coarse grained level, the storage device is divided into partitions for top-level device functions. Then within some of those partitions—such as userdata—there are filesystems, which let you add and remove an arbitrary number of files.
Table of OnePlus 6 Partitions
To give you a picture of what the partitions look like in practice, I dumped the following table from my OnePlus phone. Your phone partition details may differ slightly due to different storage options or perhaps the initial flash version, but it will be very close to this:
| Name | Partition | Size (kB) | Path | Type |
|---|---|---|---|---|
| ALIGN_TO_128K_1 | sdd1 | 52 | ||
| ALIGN_TO_128K_2 | sdf1 | 52 | ||
| ImageFv | sde72 | 1024 | ||
| LOGO_a | sde20 | 8192 | ||
| LOGO_b | sde48 | 8192 | ||
| abl_a | sde8 | 4096 | ||
| abl_b | sde36 | 4096 | ||
| aop_a | sde1 | 256 | ||
| aop_b | sde29 | 256 | ||
| apdp | sde63 | 128 | ||
| bluetooth_a | sde5 | 512 | /vendor/bt_firmware | vfat |
| bluetooth_b | sde33 | 512 | ||
| boot_a | sde11 | 32768 | ||
| boot_aging | sde58 | 32768 | ||
| boot_b | sde39 | 32768 | ||
| cdt | sdd2 | 64 | ||
| cmnlib64_a | sde13 | 256 | ||
| cmnlib64_b | sde41 | 256 | ||
| cmnlib_a | sde12 | 256 | ||
| cmnlib_b | sde40 | 256 | ||
| config | sda12 | 256 | ||
| ddr | sdd3 | 512 | ||
| devcfg_a | sde14 | 64 | ||
| devcfg_b | sde42 | 64 | ||
| devinfo | sde61 | 2 | ||
| dip | sde62 | 512 | ||
| dsp_a | sde9 | 16384 | /vendor/dsp | ext4 |
| dsp_b | sde37 | 16384 | ||
| dtbo_a | sde18 | 4096 | ||
| dtbo_b | sde46 | 4096 | ||
| frp | sda6 | 256 | ||
| fsc | sdf5 | 64 | ||
| fsg | sdf4 | 1024 | ||
| fw_4j1ed_a | sde21 | 1024 | ||
| fw_4j1ed_b | sde49 | 1024 | ||
| fw_4u1ea_a | sde22 | 1024 | ||
| fw_4u1ea_b | sde50 | 1024 | ||
| fw_ufs3_a | sde23 | 1024 | ||
| fw_ufs3_b | sde51 | 1024 | ||
| fw_ufs4_a | sde24 | 1024 | ||
| fw_ufs4_b | sde52 | 1024 | ||
| fw_ufs5_a | sde25 | 1024 | ||
| fw_ufs5_b | sde53 | 1024 | ||
| fw_ufs6_a | sde26 | 1024 | ||
| fw_ufs6_b | sde54 | 1024 | ||
| fw_ufs7_a | sde27 | 1024 | ||
| fw_ufs7_b | sde55 | 1024 | ||
| fw_ufs8_a | sde28 | 1024 | ||
| fw_ufs8_b | sde56 | 1024 | ||
| hyp_a | sde3 | 256 | ||
| hyp_b | sde31 | 256 | ||
| keymaster_a | sde10 | 256 | ||
| keymaster_b | sde38 | 256 | ||
| keystore | sda5 | 256 | ||
| limits | sde67 | 2 | ||
| logdump | sde71 | 32768 | ||
| logfs | sde69 | 4096 | ||
| mdtp_a | sde7 | 16384 | ||
| mdtp_b | sde35 | 16384 | ||
| mdtpsecapp_a | sde6 | 2048 | ||
| mdtpsecapp_b | sde34 | 2048 | ||
| minidump | sde57 | 51200 | ||
| misc | sda3 | 512 | ||
| modem_a | sde4 | 61440 | /vendor/firmware_mnt | vfat |
| modem_b | sde32 | 61440 | ||
| modemst1 | sdf2 | 1024 | ||
| modemst2 | sdf3 | 1024 | ||
| msadp | sde64 | 128 | ||
| odm_a | sda15 | 51200 | ||
| odm_b | sda16 | 51200 | ||
| oem_dycnvbk | sda8 | 5120 | ||
| oem_stanvbk | sda9 | 5120 | ||
| op1 | sde59 | 51200 | /op1 | ext4 |
| op2 | sda7 | 131072 | /op2 | ext4 |
| param | sda4 | 512 | ||
| persist | sda2 | 16384 | /mnt/vendor/persist | ext4 |
| qupfw_a | sde15 | 32 | ||
| qupfw_b | sde43 | 32 | ||
| reserve1 | sda10 | 4048 | ||
| reserve2 | sda11 | 8096 | ||
| sec | sde60 | 8 | ||
| splash | sde66 | 16712 | ||
| spunvm | sde65 | 4096 | ||
| ssd | sda1 | 4 | ||
| sti | sde70 | 1024 | ||
| storsec_a | sde19 | 64 | ||
| storsec_b | sde47 | 64 | ||
| system_a | sda13 | 1464320 | ||
| system_b | sda14 | 1464320 | ||
| toolsfv | sde68 | 512 | ||
| tz_a | sde2 | 1024 | ||
| tz_b | sde30 | 1024 | ||
| userdata | sda17 | 120152438 | /data | ext4 |
| vbmeta_a | sde17 | 32 | ||
| vbmeta_b | sde45 | 32 | ||
| vendor_a | sde16 | 524288 | ||
| vendor_b | sde44 | 524288 | ||
| xbl_a | sdb1 | 1792 | ||
| xbl_b | sdc1 | 1792 | ||
| xbl_config_a | sdb2 | 64 | ||
| xbl_config_b | sdc2 | 64 |
Appendix: Recovering From A Bricked Phone
If you get to the point where you can’t start your phone normally, and you can’t get it to fastboot any more either, then your phone is probably “bricked”. Thankfully, there is one more mode to try—Emergency Download Mode (EDL).
Important: this step requires a Windows PC with Administrator access. The reason is that we need to use a proprietary (presumably leaked) tool which happens to be Windows-only. Borrow someone’s computer if you have to.
It probably goes without saying, considering that your phone is already borked if you are reading this, but literally everything on the phone will be reset/erased back to factory defaults if you perform this recovery. You have been warned.
Download the Tool
Because we are dealing with a leaked tool, there is no official website to go download it from. Thankfully, a community member, Titokhan, uploaded the file here: enchilada_22_O.15_180810_unlocked.7z.
If you have trouble flashing the file in a later step, there also a couple other versions you can try.
1dc0ff12bad472d2b9da881e2c4b3221b4d95e0eb9a1b2e4e8a1a7ecf248b9ec enchilada_22_O.15_180810_unlocked.7z
83029624d5f16ba1c18b6dca64a800aac9b19090e9062c18f90260e30348a18a MsmDownloadToolV4.0InternationalVersionOxygenOS5.1.5.rar
c7fd417c41c45bac4e59934be3df75038165c8ec4250e8592a400c008fe9208f OnePlus+6_180513_氢OS线刷包.rar
The above SHA-256 hashes are provided so you can verify that the file you downloaded matches the one I used. I make no guarantees about the trustworthiness of the files, other than that I used them and they worked for me. YMMV.
Connect Your Phone In EDL Mode
- Disconnect the USB cable from your phone (if plugged in)
- Power off your phone (if you can)
- Hold down Volume Up
- Connect your phone to the computer with a USB cable
- Wait for your computer to play a sound (indicating that it found a device)
- Release the Volume Up button
Verify Driver Installation
Open the Device Manager and make sure your phone is connected as a “Qualcomm” device under Ports (COM & LPT):
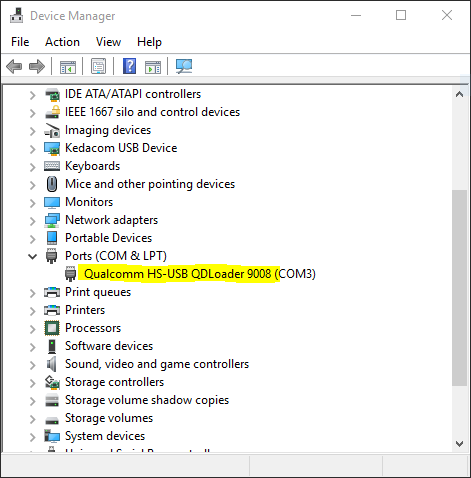
If you see QUSB_BULK or something like that, give it a few minutes. Also make sure your computer is connected to the internet. Windows 10 can often download the correct driver and install it automatically if you give it time.
If the device still shows up as QUSB_BULK* (even after waiting), go follow the instructions in this thread about installing the Qualcomm driver manually.
If nothing is showing up under Ports (in Device Manager), go back and re-try the steps from the previous section.
Flash the Stock ROM
- Extract the
.7zfile you downloaded - Double click the
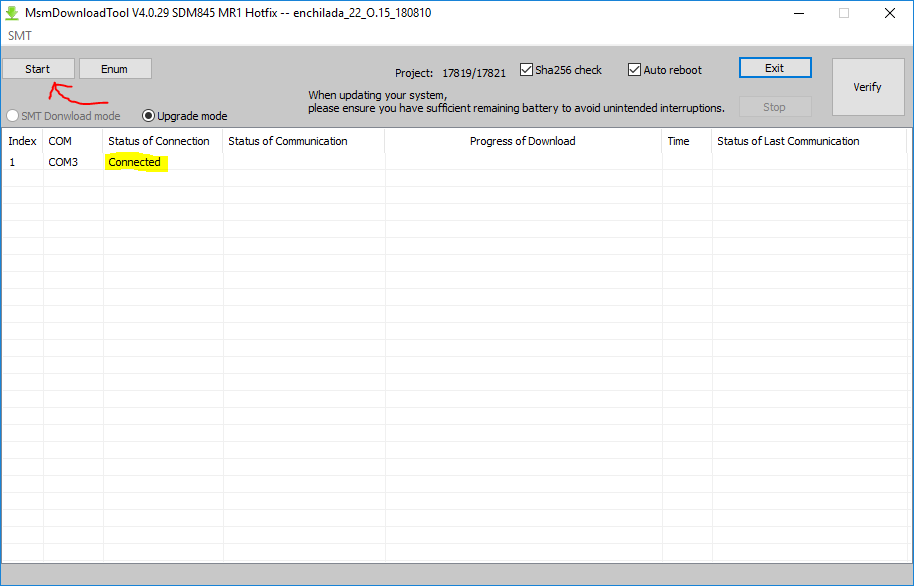
MsmDownloadTool V4.0.exefile (inside the folder you just extracted) - Click Yes if User Account Control prompts you to “allow this app […] to make changes to your device”
- Verify that the connection status shows “Connected”
- Press Start to begin re-flashing the phone
Don’t power anything off or disconnect anything until the process is complete, unless you really do want an unrecoverable phone. The process can take a while, since it has to re-flash every file on the phone.
When the process is done, the phone will reboot automatically into the OxygenOS setup screen. After that happens, you can safely disconnect the phone from the computer and close the MsmDownloadTool software (you can ignore any of its warnings at this point).
Assuming your phone successfully booted into OxygenOS at this point, you can resume back with step 1.
If the phone never shows up as “Connected” in the MsmDownloadTool, first try rebooting your computer, then repeat all the steps from the beginning of “Recovering From A Bricked Phone”. If that still doesn’t work, try a different computer.
If the phone shows up as “Connected”, but some part of the flash fails, try downloading a different version of MsmDownloadTool (under the “Download the Tool” section). If that still doesn’t work, try a different computer.
Appendix: Recovery vs FastBoot vs EDL
I think most users have a basic understanding that Android is the Operating System (OS) that underlies the software on their device. Where it gets confusing is learning that there are other, special purpose OSes built-in to Android devices. Specifically on the OnePlus 6 you have:
- Recovery - the most fully featured of the built-in recovery modes
- FastBoot - a stripped down mode that lets the bootloader accept commands from the computer
- EDL - an even more stripped down mode specific to Qualcomm devices
Recovery Mode
Of all the modes listed, Recovery mode is the closest to being a proper OS. When it boots you are starting a full Linux kernel, just like when you start your Android OS normally. The difference comes after the kernel boots: instead of running the Android OS software, it runs the recovery software instead.
OnePlus phones come by default with its own recovery software installed. However, the default recovery software is not nearly as powerful as it could be. That is why we install a custom recovery, TWRP, to replace it. With TWRP you have a fully functioning touch screen interface that lets you manipulate device files (even on encrypted devices), it can flash installer .zips, and do a whole bunch more. It really is its own OS, albeit a very simple OS that essentially runs a single process.
FastBoot Mode
FastBoot mode is much simpler. It doesn’t let you do much, if anything, from the device itself. However, if you use a USB cable to connect the device to your computer, you can send all kinds of interesting commands. The main purpose of FastBoot is to be able to recover the device and/or make tweaks without having to rely on there being an OS (whether Android or Recovery) functioning on the device.
Most Android devices have a FastBoot mode, however the implementation varies from manufacturer to manufacturer. The thing they all have in common is that they talk the same protocol to the computer. (Although each phone manufacturer can extend FastBoot with custom commands.) Unlike the recovery software, you can’t generally replace the FastBoot software that comes on your phone, since it is baked into the bootloader. If you are curious, you can read more about the OnePlus bootloader here.
Emergency Download Mode (EDL)
FastBoot kind of sucks on the OnePlus 6. When you are wiping partitions and flashing custom ROMs, it is really easy to break FastBoot mode. I have never broken it so badly that FastBoot won’t start, but I can’t count how many times FastBoot has been in a state where it won’t accept commands correctly.
The reason why FastBoot mode is so brittle on the OnePlus 6, is probably because OnePlus the company knows they can always fix your phone using a different mode baked into many Qualcomm devices: Emergency Download Mode (EDL). EDL is basically a proprietary FastBoot mode that speaks the Firehose/Sahara protocols instead of the FastBoot protocol. I don’t understand the details myself, but if you are curious you can read more about it on the Aleph Security blog
Notes
- Not OnePlus phones, of course. They ship from the manufacturer without bloat.
- Even with an 100% open source project like LineageOS, your phone won’t run without proprietary code leftover on the device from the stock firmware.
- Sadly, being the best for privacy does not imply it is the best for security, and vice versa. Check out GrapheneOS if you need security (not available on OnePlus phones, sadly).
- Personally, I like to download the files to my computer first since a) it makes verifying file signatures a little easier, and b) so I have a backup.
- Strictly speaking, you could continue to use the FastBoot method to boot TWRP without issue some of the time. However, I found that method to be finicky and prone to bricking the phone. It is both safer and in my experience faster to always flash TWRP.
Credits
The phone frame used in the diagrams comes from Mauricio Allende.
Thanks to Dima for reaching out with a warning that installing the TWRP app can result in a broken LineageOS installation.